Before Elearning Courses can be linked to Wisenet Course Offers or Unit Offers, the Elearning Integration must be correctly installed.
This ensures that all Elearning Courses have synced to Wisenet and that any changes continue to sync. If you haven’t done so already, here are the links for:
Pre-Steps
Before you begin, make sure you have:
- Course Offers or Unit Offers created.
- Elearning Courses Synced. These are the fields that are synced between Wisenet and the respective LMS.
| LMS | Mapped Fields |
| Moodle | ParentCategory |
| ChildCategory | |
| Course Full Name | |
| Canvas | CourseName |
| CourseCode | |
| Course SIS ID |
1
[Canvas only] Decide if you want to use Automatic Linking
Automatic Linking means that as soon as a course in Canvas is created, it will be automatically linked to the relevant Course Offer / Unit Offer in Wisenet.
If you don’t want to use Automatic Linking, continue to Step 2.
2
Add Elearning Course
- Navigate to LRM > Offers. Search and open the relevant Course Offer. NOTE: Even if you are connecting the Elearning Course to a Unit Offer, you must do this from the relevant Course Offer page.
- On the Left Navigation Bar, Click Elearning
- On the Top Right Corner, Click Add Elearning Course

3
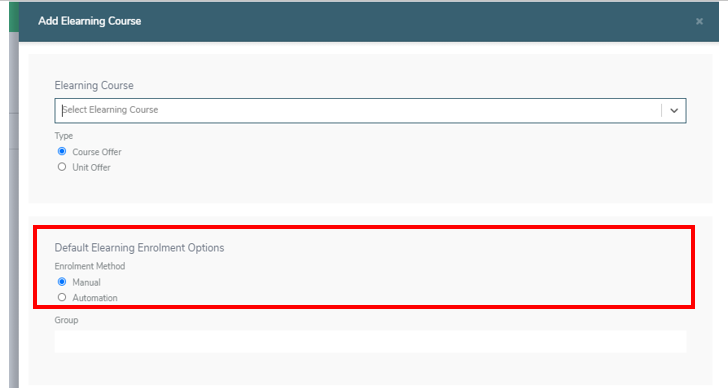
Select Elearning Course
This dropdown should show a list of all Elearning Courses that have synced from the Elearning application.
- Select the required Elearning Course from the Dropdown
- Select Type
- Course Offer: when the Elearning Enrolment will be based on the Course Enrolment in to the Course Offer only
- Unit Offer: when the Eleanring Enrolment is based on a Unit Enrolment into a specific Unit Offer

4
Default Elearning Enrolment Options
Choose your preferred Enrolment Method:
- Manual: This option allows you to manually Enable or Disable Elearning Enrolments as required.
- Automation: This option allows Elearning Enrolment Rules to automatically Enable or Disable Elearning Enrolment access based on Enrolment Start and End Dates.
- see How to Set Up Elearning Enrolment Rules in Wisenet
- Elearning Enrolment Rules are different depending on whether the Elearning Course is linked to a Course Offer or Unit Offer

5
Group / Section
Notes:
- Group is the term used in Moodle
- Section is the term used in Canvas
This is optional but a great feature to use to group/section Elearning Enrolments. For example, you can group/section your Elearning Enrolments by Training Location, Start & End Dates, etc. The defined Group/Section value will be synced to the Elearning system for the specific Elearning Course and any Enrolments will be added as a member of this group/section.
This eliminates a lot of manual group/section management and is currently available for Moodle and Canvas Integration.
Options:
Set a Group/Section: Type the name of the Group/Section in the text box. It’s best to keep Group/Section names succinct. Group/Section names can be duplicated across Courses.
No Groups/Sections: Leave the group text box empty.
6
Save Options
- Click Save if you do not wish to add Enrolments at this stage.
- Click Save and Add Enrolments if you already have Course/Unit Enrolments set up
- This will show a list of Learners who are Enrolled in the Course Offer / Unit Offer but NOT already enrolled in the linked Elearning Course. To Add Elearning Enrolments:
- Tick the Learners that require an Elearning Enrolment
- Click Add Elearning Enrolments
- By default a Learner in Wisenet has Elearning Enrolment access as Disabled
- This will show a list of Learners who are Enrolled in the Course Offer / Unit Offer but NOT already enrolled in the linked Elearning Course. To Add Elearning Enrolments:
Under the Elearning Courses Tab, you will now see, in alphabetical order, all the Courses from your LMS that you have successfully linked to your Course/Unit Offers, along with details such as:
- Course Name
- Course Type
- Default Enrolment Method
- Number of Enrolments
- Default Group/Section details
- Course Status, i.e. Active or Inactive
- NOTE: When an Elearning Course is deleted in your LMS, the Elearning Course will not be deleted in Wisenet. Instead it will receive a status of Inactive.

Edit Options
You can always add more Enrolments and/or Edit the Elearning Courses at a later stage. However, please note:
- Elearning Type cannot be edited if there are linked Elearning Enrolments
- Editing Defaults will not auto update linked Elearning Enrolments
Delete Option
You can delete a linked Elearning course but please note:
- Both the Elearning Course and the linked Elearning Enrolments will be permanently deleted in Wisenet
- Elearning Enrolments within your LMS will be Disabled and set to Inactive
When you click on the Delete Button, you will see a deletion confirmation display on your screen with a warning note. If you wish to proceed with the deletion then click Yes, delete. Otherwise click Cancel to abort.

