You can now connect to Elearning applications like Moodle to establish a two-way integration to sync Elearning Courses, Elearning Enrolments and Grade. All Elearning management is configured from within the Wisenet app.
Setting up your Elearning Integration should be a one time process. To reach the milestone of streamlined automation, some complex setup is required. Follow the steps below comprehensively. If you do not see the option to connect to Moodle on the LRM > Settings > Connected Apps page then log a support request.
Steps to setup Moodle API and enable Web Services
There are a number of steps that need to be followed to enable Web Services. This is a one-time setup to allow Wisenet to interact with Moodle for your Elearning enrolment requirements. Please follow the steps comprehensively.
M1
M2
Enable Protocols
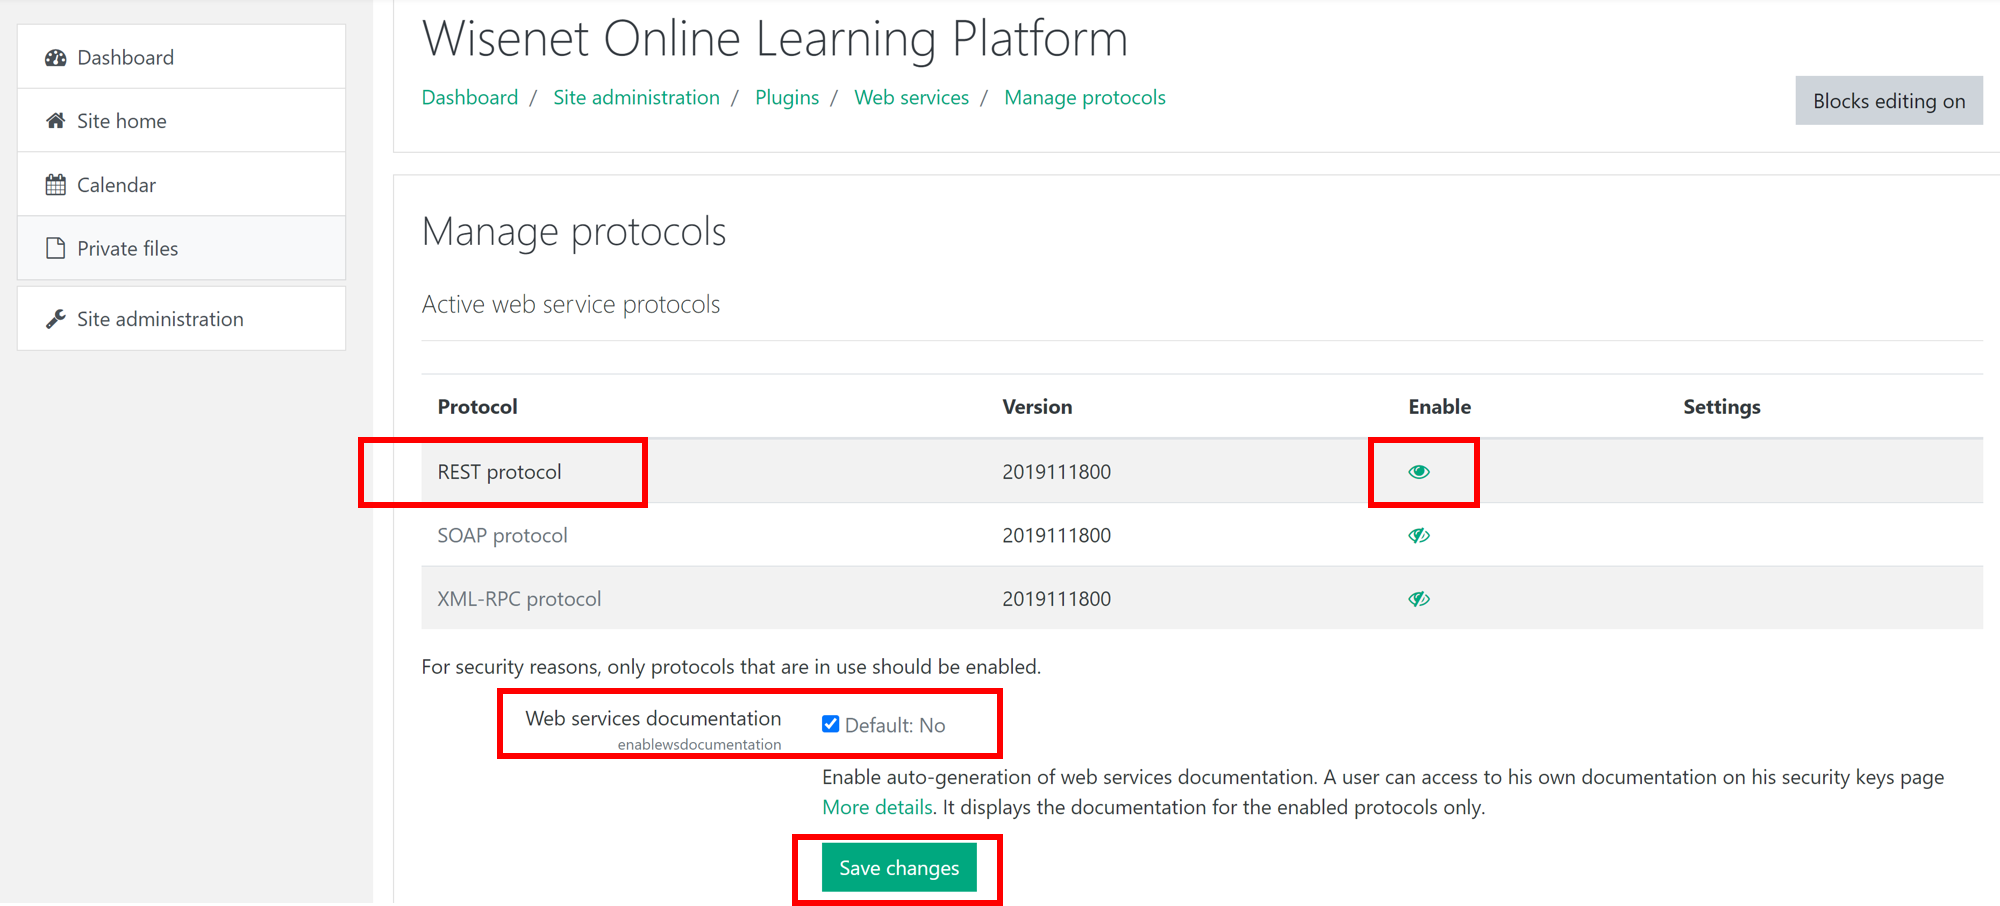
- Navigate to Site administration > Plugins > Web services > Manage protocols to ensure that the REST Protocol is enabled.
- Click on Enable protocols
- Click on the eye icon to Enable
- Leave Web Services documentation as per the current value. It can be either On or Off for the Wisenet integration.
M3
Create a new Moodle User for Wisenet Connector
It is best to have a User designated to Wisenet Connector as it ensures that the User has exactly the right access. It also prevents the integration from stopping due to changes to an existing users’ access. You should never need to login as this new Moodle User will only access Moodle via the API.
- Navigate to Site administration > Users > Accounts > Add a new user
- You can create any username as you wish however it is recommended to make it clear that it is for Elearning Integration purposes eg. You can use the following information:
- Username: wisenetconnector
- Authentication Method: Manual
- Password: Set a complex password
- Force Password Change: Do NOT tick this
- First Name: Wisenet
- Last Name: Connector
- Email Address: This can be any email address that is not in use
- Email Display: Best to choose “Hide my email address from non-privileged users
- You can create any username as you wish however it is recommended to make it clear that it is for Elearning Integration purposes eg. You can use the following information:
- Click Create User
- Login with this User
- It is best to login with this newly created user to ensure that any first login processes are completed. If this step is not done it can prevent the integration from connecting.
- Tip: It is best to use an incognito window as it allows you to login with another session while still keeping your current admin session open
- To do this click File > Open New Incognito Window
M4
Create a New Web Service User Role
This is to ensure that the Wisenet Connector User has ONLY just enough capability. We are going to use a role preset to fast-track the role set up.
- Download the Preset File that corresponds to your Moodle site version:
- Version 3.6 +
- Version 3.4 and under
- The file will open in a new tab in your browser
- Save the Preset file on your PC as an xml. file type
- If the Preset File does not work then you are likely on an older Moodle version and you will need to manually create a new role.
- Navigate to Site administration > Users > Permissions > Define Roles
- Under the Manage Roles tab, check if there is an existing Wisenet Connector User role. If No:
- Scroll to the bottom of the list of roles, Click Add a new role
- Upload the Preset File that you recently downloaded by using either the Drag & Drop option, or Choose a File option
- Once the upload is successful, Click Continue
- You should not need to make any changes to this ‘Adding a new role’ page. Just click Create this role.
Review New Role
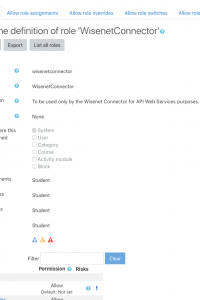
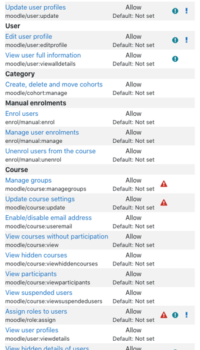
Double check that the new role is correctly set up and has the right capabilities. Expand the images below for what this should look like. If you notice differences then use the instructions to edit the role as required.
M5
Assign the Role to the New User
This will ensure that the new Wisenet Connector User has the new Role.
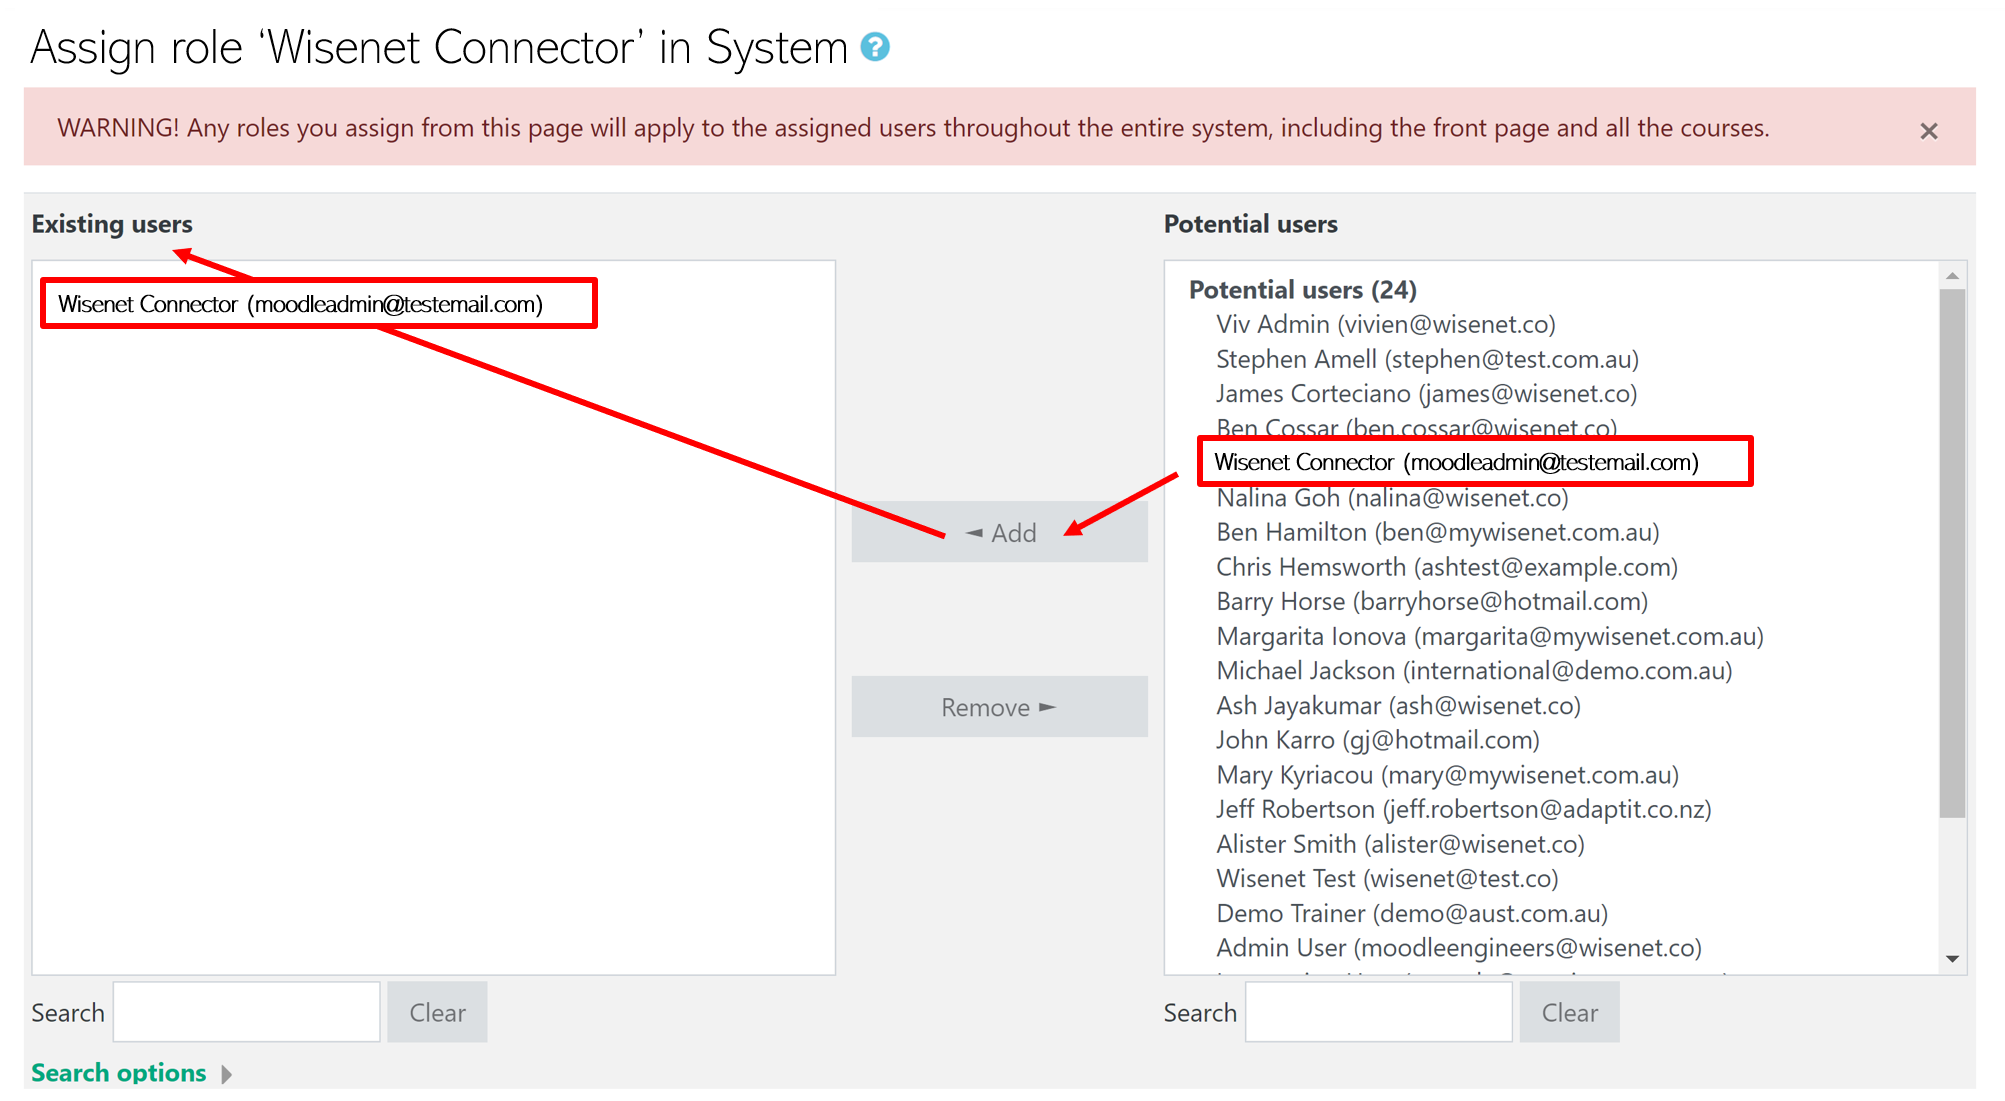
- Navigate to Site administration > Users > Permissions > Assign system roles
- You should see the Wisenet Connector role. Click on the role name.
- This will take you to a page where you can move users from right to left. Search for the Wisenet Connector User on the right and ensure that it appears under Existing users.
M6
Ensure a Service is configured for Wisenet
A service needs to be set up under Custom services. If one does not exist then:
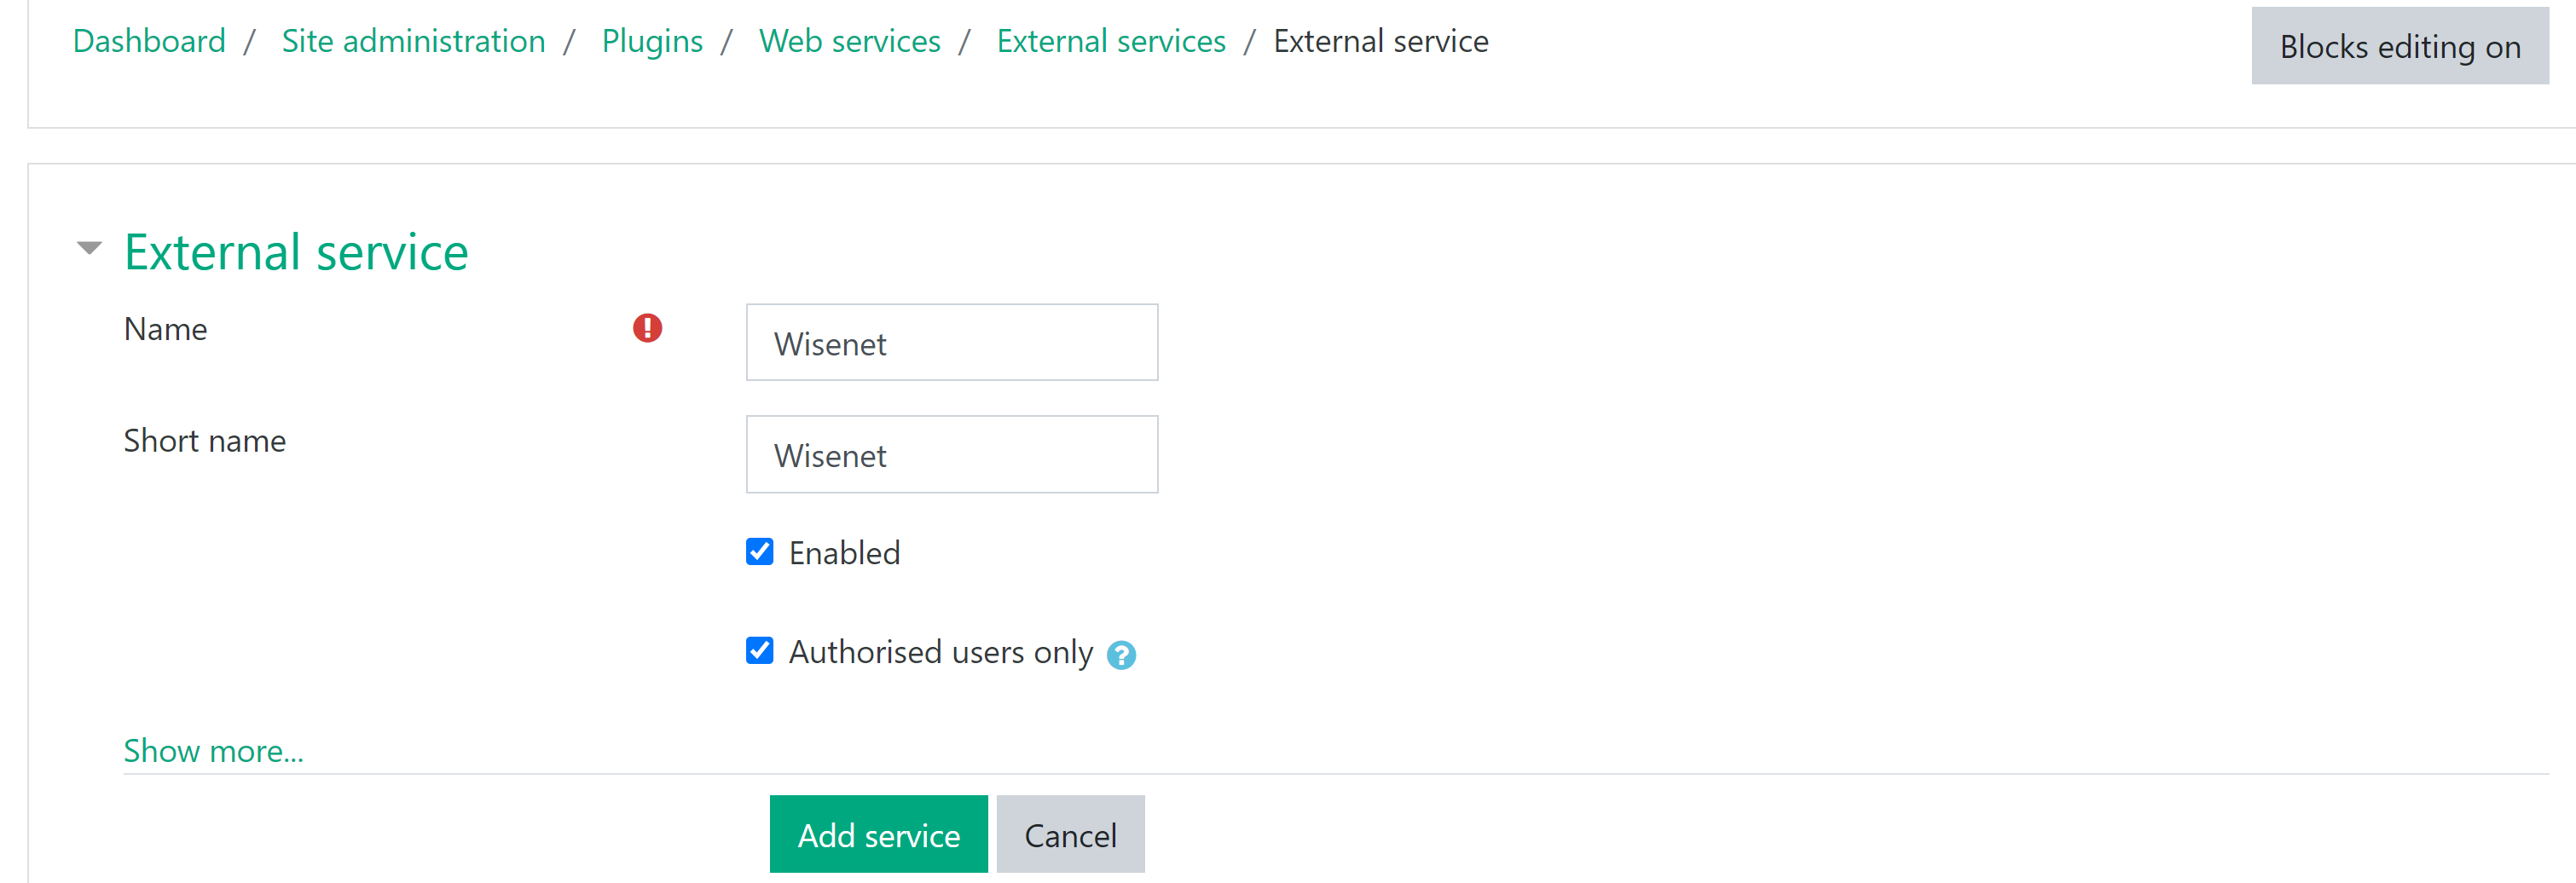
- Navigate to Site administration > Plugins > Web services > External services
- Click Add at the bottom of the page
- Set the following details:
- Name: Wisenet
- Short name: Wisenet
- Enabled = Ticked
- Authorised users only = Ticked
- No other details are required
- Click Add service
M7
Add functions to the Service
- You should now see the newly created Wisenet service under Custom Services / External Service. If you don’t then please complete Step M6.
- Click on Functions
- This will take you to a page to Add functions to the service “Wisenet”. Click Add functions
- Search and select all of the following 18 functions:
- core_auth_confirm_user
- core_course_get_courses
- core_course_get_courses_by_field
- core_course_get_categories
- core_enrol_get_users_courses
- core_enrol_unenrol_user_enrolment
- core_group_add_group_members
- core_group_create_groups
- core_group_delete_group_members
- core_group_get_course_groups
- core_group_get_course_user_groups
- core_group_get_group_members
- core_group_get_groups
- core_user_create_users
- core_user_get_users
- core_user_update_users
- enrol_manual_enrol_users
- enrol_manual_unenrol_users
5. Click Add functions
M8
Add Authorised User to the Service
- Navigate back to the Side administration > Plugins > Web services > External services page
- Click the Authorised users link in the table
- This will take you to a page where you can move Users from right to left. Search for the Wisenet Connector User on the right. Click Add to move it under Authorised users.
M9
Create a Token for the User
A token is used by the API. It needs to be created against a specific Service for a specific User.
- Navigate to Site administration > Plugins > Web services > Manage tokens
- Select Add
- Set the following details:
- User: Search and select the newly created Wisenet Connector User
- Service: Select the newly created Wisenet service from the dropdown
IMPORTANT! Do NOT set an IP restriction nor a Valid until date.
4. Click Save Changes
NOTE: Any token can be deleted but only you can view tokens that you created.
M10
Copy the Moodle Web Token
The token that was just created will need to be used in the following Wisenet > Connected App > Moodle process.
Copy the Token to your clipboard and proceed to the next step.
Steps to connect Moodle in Wisenet
Ensure you are the Portal Admin and LRM Owner in Wisenet.
W1
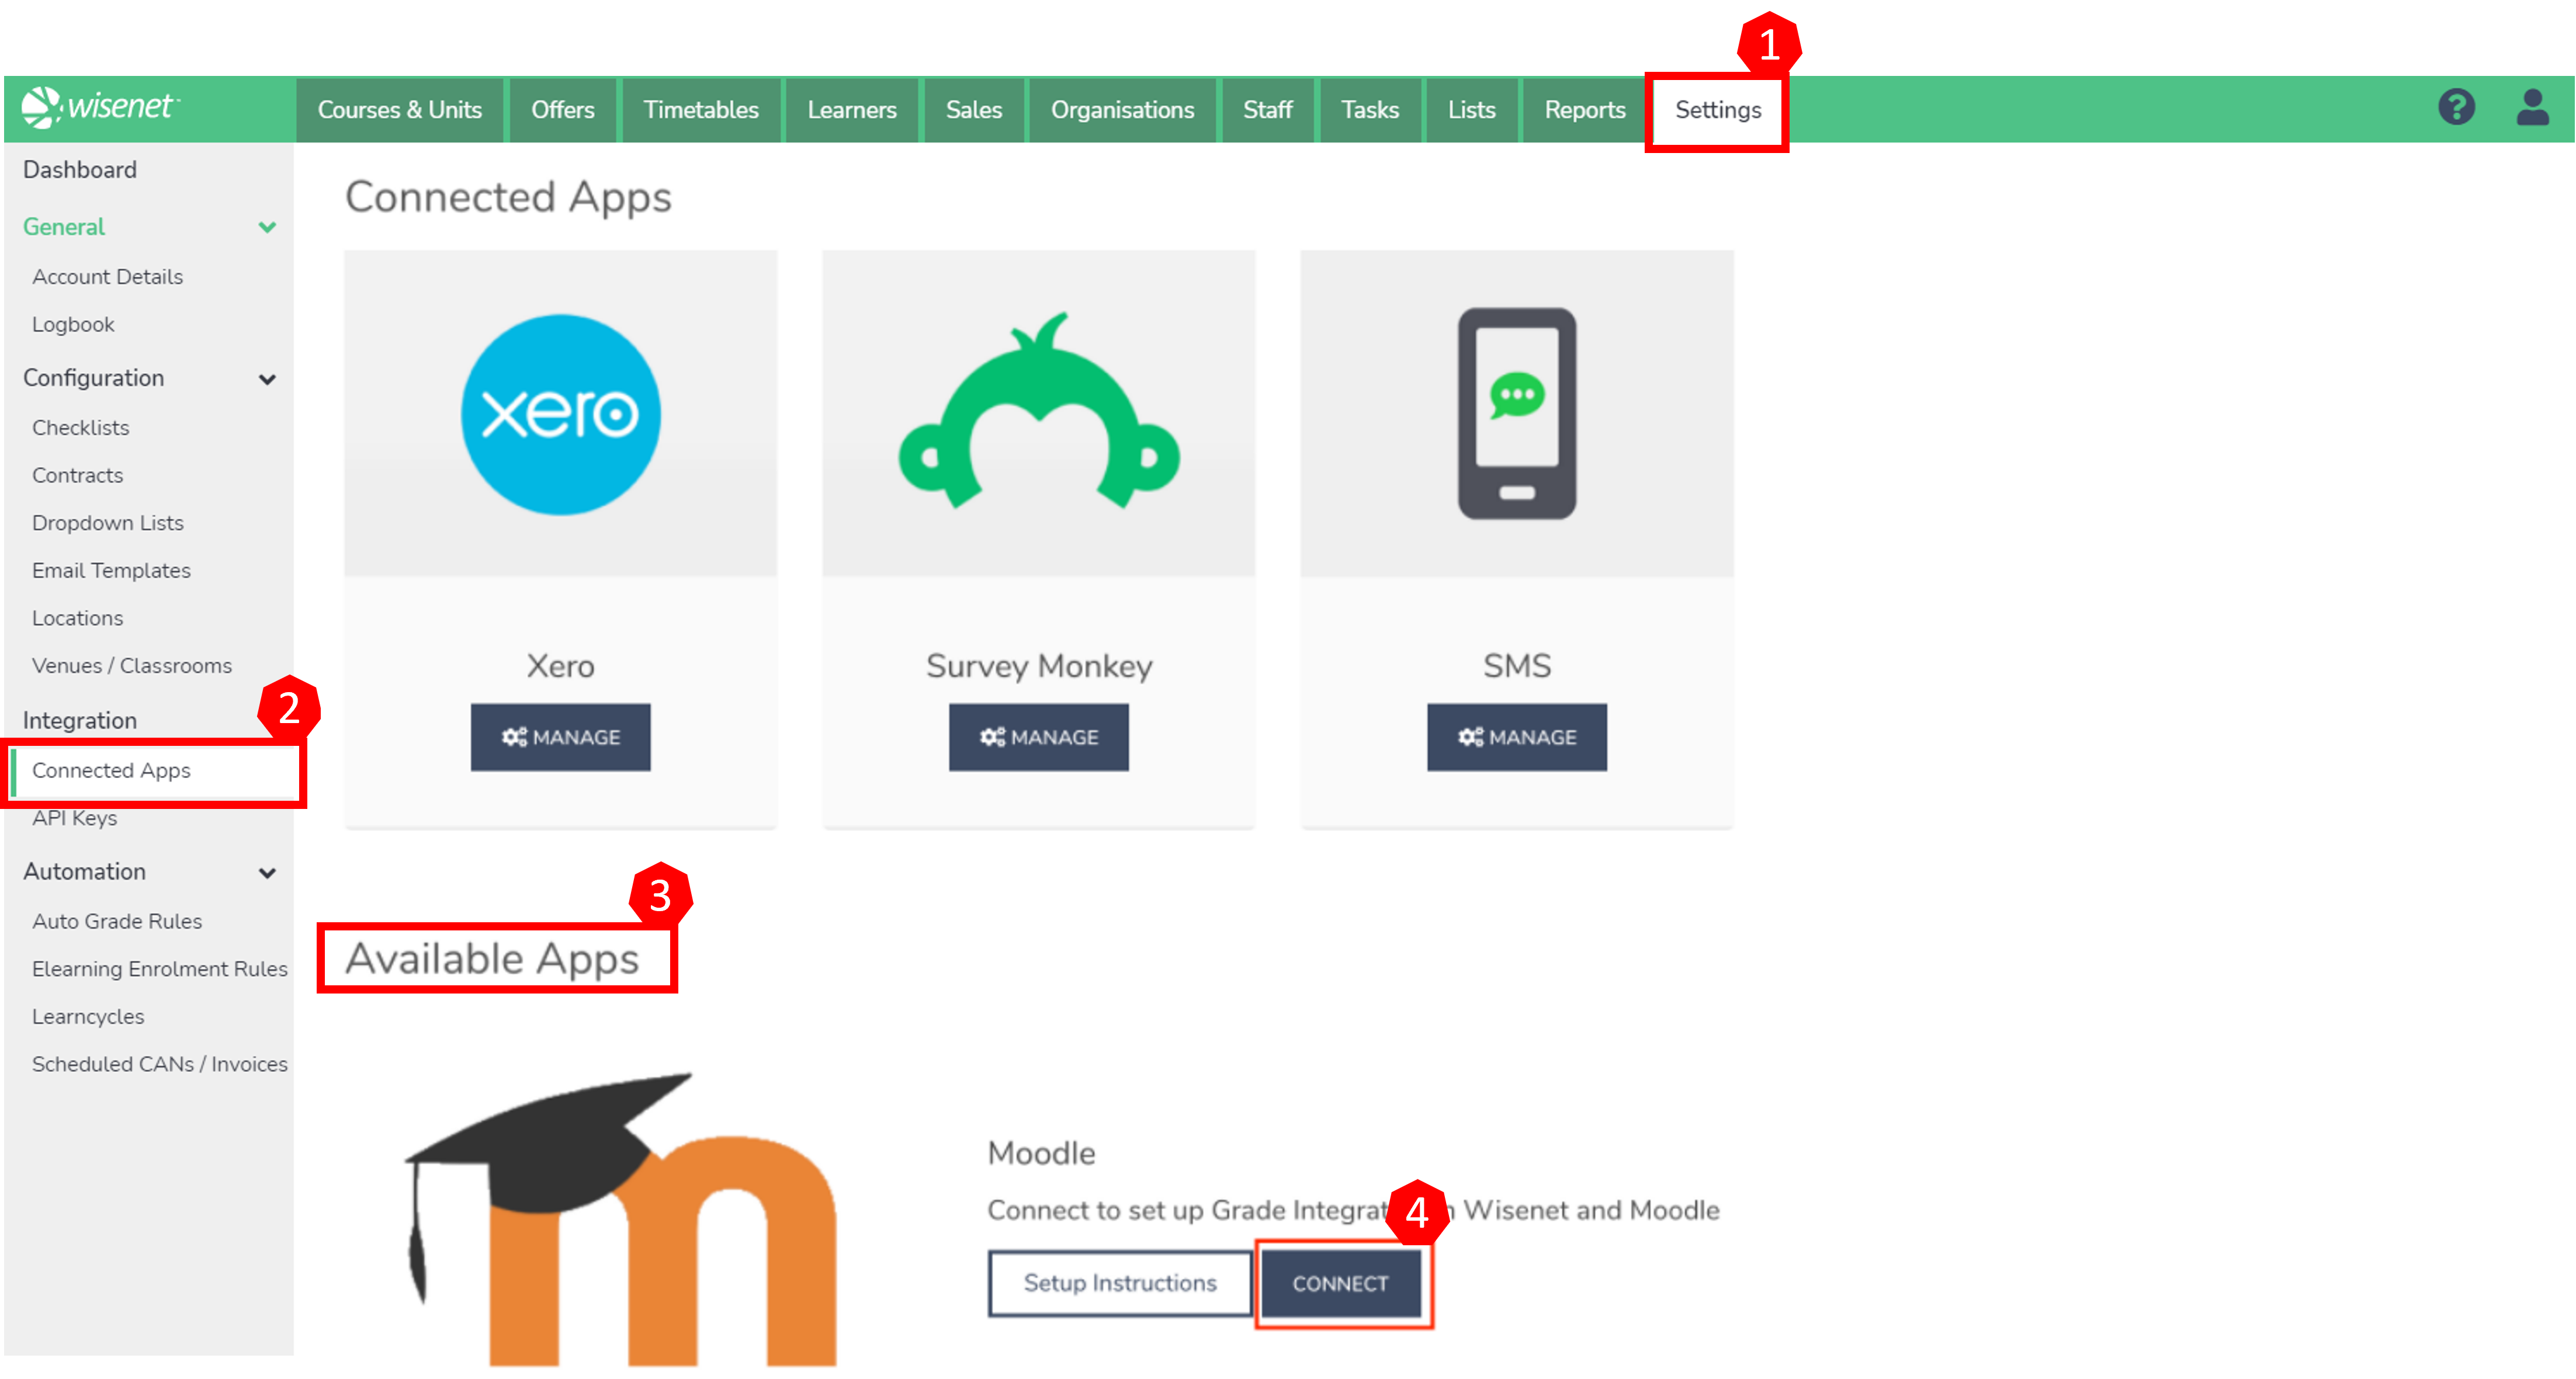
- Navigate to Wisenet LRM > Settings
- In the Integration box, Click Connected Apps
- You will see a list of all your Connected Apps as well as Available Apps. Next to the Moodle Application select Connect to begin the process
- Manage App by entering the connection details required as per Step W2 below
W2
The Connected App is divided into three different sections:
- Wisenet Connection Details which will automatically generate your Account ID.
- Auto Grade Connection Details. This is where you can find your Auto Grade API Key if you are a Moodle Premium Customer. Follow Auto Grade Set Up Instructions below.
- Elearning Connection Details which you are required to configure based on the token created in Moodle. To do so:
- Click Edit
- Enter a Site Nickname.
- This is particularly useful if you have multiple sites. Just enter Moodle if you have just one site.
- Enter your Moodle Site URL.
- This is just the domain part of the url.
- Choose an Authentication Method.
- The default is to use Moodle as this uses built in Moodle auth and will automatically send the User login details
- If you have your own custom Authentication method, then setting this will ensure all users will use this method
- Enter the Moodle API Token. Learn More? How to Generate a Moodle API Token
- You should see the Connection Status saying Connected Successfully.
- If the status says Failed or Not Connected, please verify that you have not missed any step mentioned from Step M1 to M9 on your Moodle site.
- You should see the Connection Status saying Connected Successfully.
W3
Check Connection Status
If the Connection Status is:
- Connected Successfully then you are ready to go. You should now Resync Elearning Courses if required.
- Failed to Connect then review the steps above to ensure nothing was missed. If still an issue the please contact Wisenet Support.
W4
Initial Course Sync
It is important to complete an initial Course Sync once the connection is successful. This will sync all of the Courses from Moodle to Wisenet.
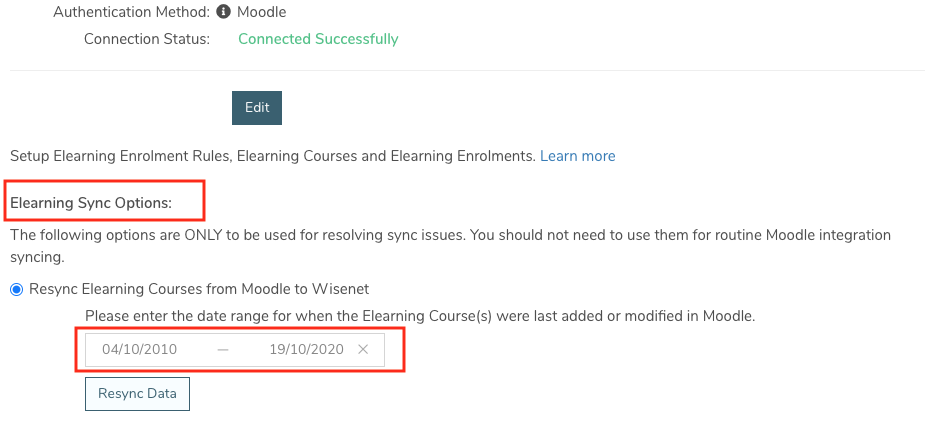
- Find the section Elearning Sync Options at the bottom of the page (This will only appear if the connection is successful)
- Choose the option Resync Elearning Courses from Moodle to Wisenet
- Enter a date range that captures all Course change dates
- This can be a very wide range that is well before you started using Moodle eg. 01/01/2000 to Now
- Once ready select Resync Data
- This initiates the sync. Courses typically are synced within a few minutes.
- You can see the sync’d courses by going to Course Offer > Elearning and attempting to add an Elearning Course
IMPORTANT NOTE: Elearning courses are updated only when there is a change made to Moodle courses and not to Moodle Course Categories. If you make changes to a Moodle Course Category (i.e. Category name change), you will have to resync the courses manually.
Steps to Set Up Moodle WebHooks
Once you have set up your Moodle Connected App, you are required to download and install Moodle WebHooks. This plugin allows Moodle events to raise WebHooks to a nominated URL. Therefore allowing for real-time Course information to sync between Moodle and Wisenet LRM.
M11
Check if WebHooks plugin is already installed
- Log into your Moodle site and navigate to Site administration > Plugins > Plugins overview
- Use the keyboard shortcut Ctrl + F or Command + F and search ‘WebHooks’
- If it is already installed then follow the instructions to Manage WebHooks plugin at Step M14
- If not, then follow the next step below
M12
Download plugin
NOTE: It is important that you download the correct plugin version. Check your Moodle site version prior to downloading the WebHooks plugin.
- Navigate to Moodle Official Website > Plugins > General Plugins > WebHooks
- Click the green Download button
- IMPORTANT! Choose the plugin version that corresponds to your Moodle site version
- Click Download
- The file will download as a zip file to be saved on your computer.

M13
Install plugin
- Navigate to Site administration > Plugins > Install plugins
- Either Drag and Drop or Choose a file to upload the WebHooks plugin
- Click Install plugin from the ZIP file
- It will open a validation page showing Validation successful. Click Continue
- It will provide you with a Server Check list and at the bottom of the list it should say: Server environment meets all minimum requirements. Click Perform Upgrade.
- Once done click Continue
M14
Manage WebHooks
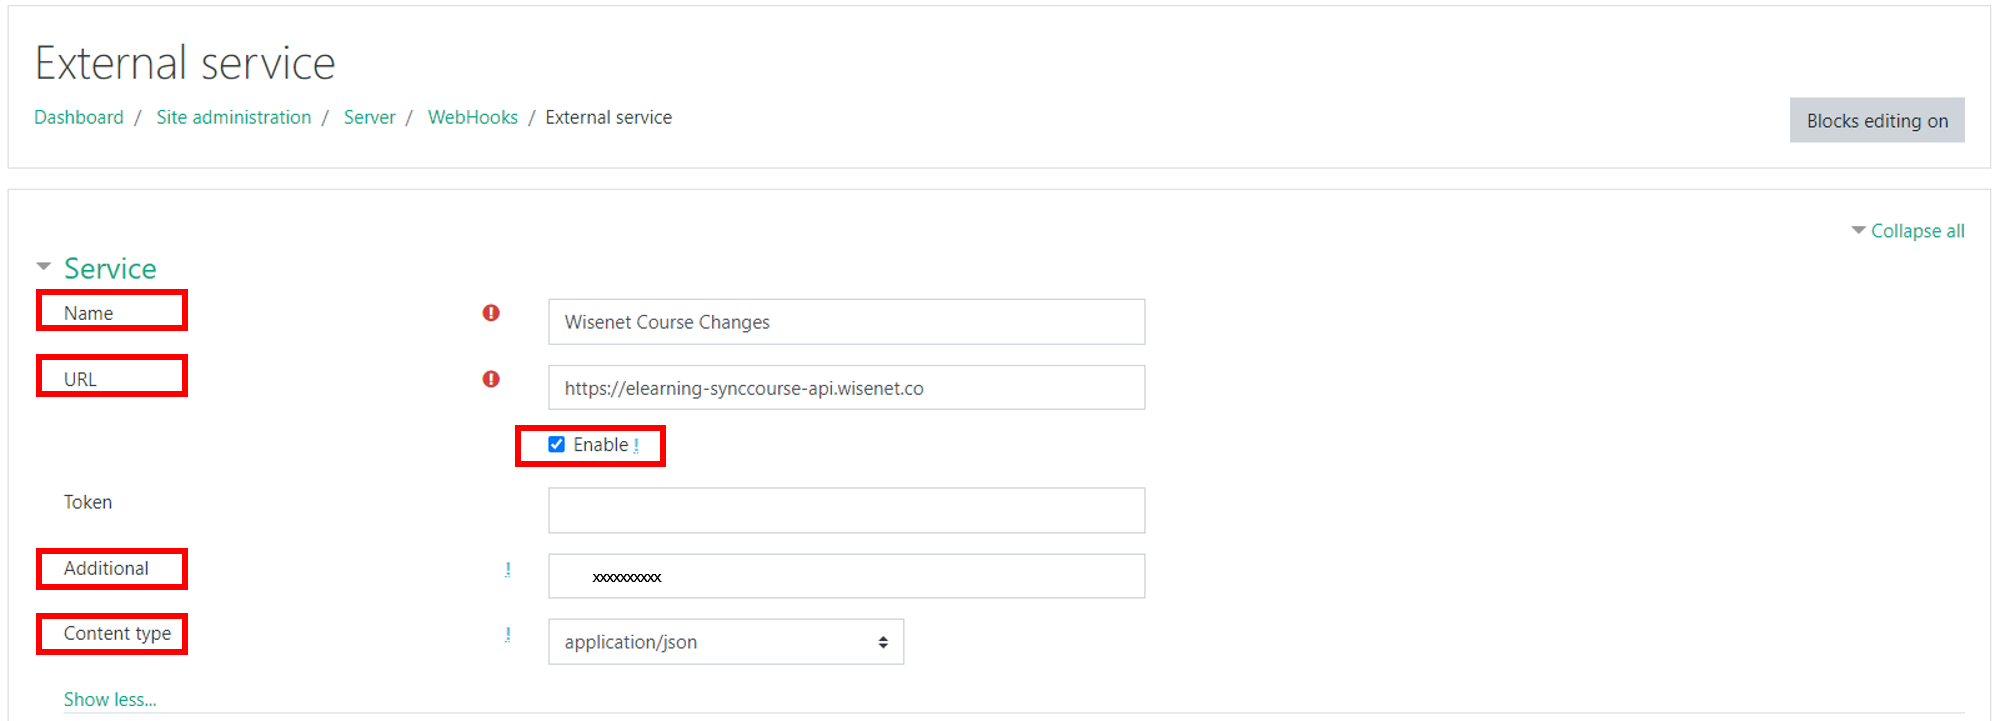
- Navigate to Site administration > Server > WebHooks
- Click Add service
- Set the following details:
- Name: Wisenet Elearning Sync Courses
- URL: https://elearning-synccourse-api.wisenet.co
- Enabled: Ticked
- Token: (leave empty)
- Additional: (Enter the 10 digit Wisenet Connection Details – Account ID that you can copy from LRM > Settings > Connected App > Manage Moodle App)
- Content type: application/json
- Events: select the following three events only:
- \core\event\course_created
- \core\event\course_deleted
- \core\event\course_updated
- \core\event\enrol_instance_created
- Click Save Changes
