Adding a Sales+ Site is easy and to make it easier we recommend you start by having the following information ready:
- Your chosen Site Name – this will help you identify which website you are managing especially if you have multiple sites
- Brand and specific design requirements
- Media files to use as part of the look and feel of your site – recommended media file sizes are advisable
Once you have set up the basic of your site, you can then update your Sales+ site to reference Contact Forms.
1
Navigate to LRM > Settings > App Settings > Sales+ > Site Management
2
Add New Site
- Click Add New Site
- Enter a Site Name. i.e. Melbourne Business Academy. The Site Name is used internally by you to identify the site. Particularly useful when you have multiple sites.
- Enter Site URL
- The Site URL is used to access Sales+. It is visible to the public once created and shared. You may want it to be the same as the site name or something more unique. For example if you type mba, your site URL will be https://study.wisenet.co/mba
- IMPORTANT NOTE: It CANNOT be changed once created!
- Click Next

3
Manage Sales+ Sites
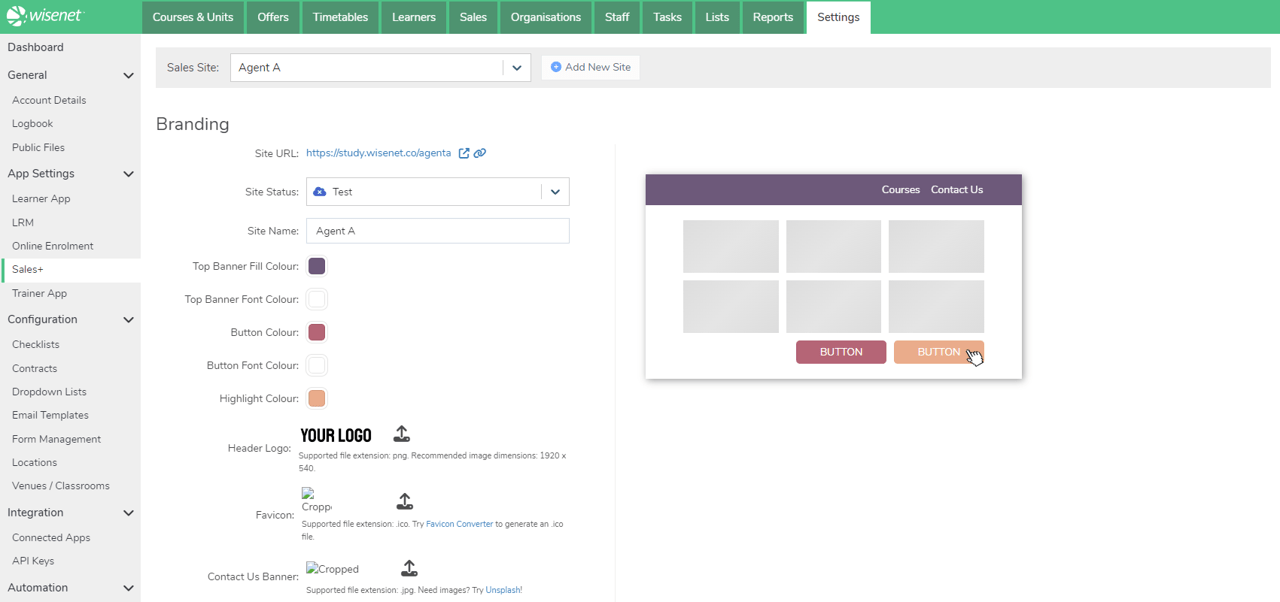
Choose the site you want to manage from the Dropdown option. If you only have 1 site, this page will display that site by default.
From here you can customise the Branding section with your brand colour, logo, Contact Us banner, etc.
On the right-hand side of the page is a dynamic preview of the colour scheme you are adding to the Sales+ site you are setting up. The colour scheme applies to:
- Top Banner Fill Colour
- Top Banner Font Colour
- Button Colour
- Button Font Colour
- Highlight Colour
NOTE: The recommended image dimensions for the Header Logo is 1920px X 540px
IMPORTANT: The Status will be set to “Test” by default. Update the status to ‘Live‘ once you are happy to go live with your site.

Optional
Application Settings
This step is optional and only applicable to customers on Premium Edition.
Toggle the Application Settings to choose whether to Show Courses / Application on your site.
You will use this option when you have all your courses published, hence why this is set to No by default.
4
Update the Sales+ Site to reference Contact Forms
Required Pre-Steps:
Once you have completed all the above steps and the required pre-steps, you can start to update your Sales+ site(s) to reference the Contact Forms.
Under Contact Settings, Add Contact Form(s) as you would like to see displayed on your page:
- Enter a Page Name – i.e. Contact Us
- Choose the relevant Form from the Contact Form dropdown option
- Enter a Display Label – The label is what the students will see on the site
- Enter any Instruction Text if required to appear on the Contact Form
- Optional – Add additional Contact Forms if required (Standard or Premium Editions ONLY)
- Click Save
