A Learncycle is a set of rules and conditions that trigger a desired action/outcome in Wisenet.
1
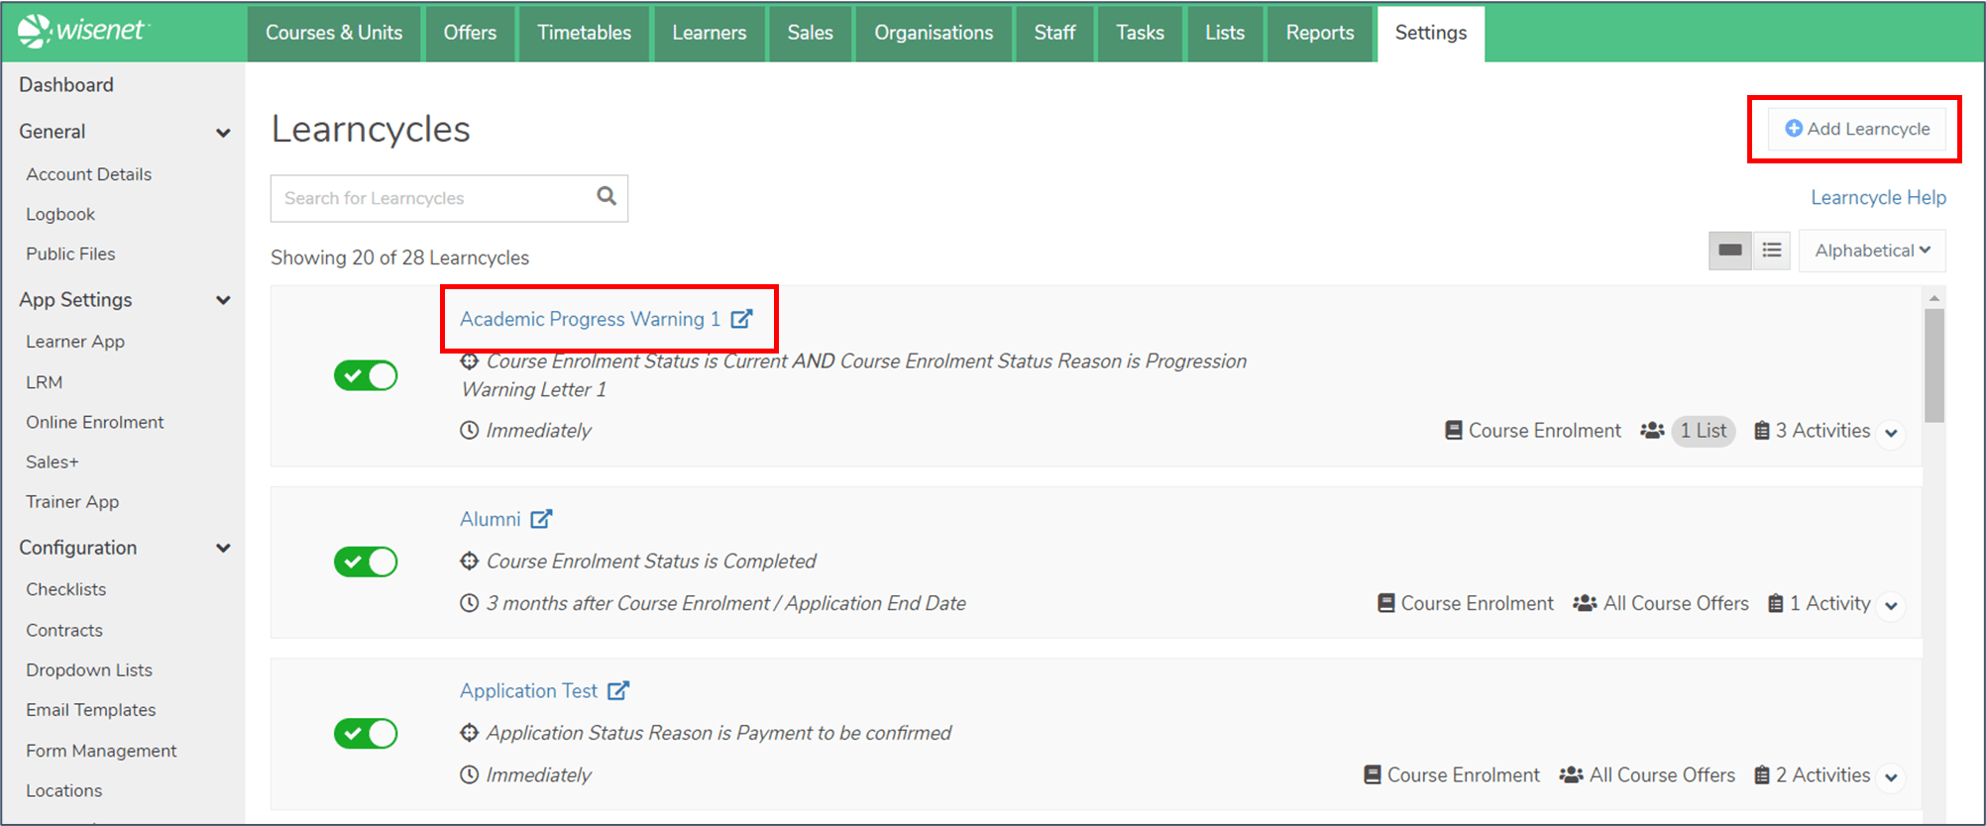
Navigate to LRM > Settings > Learncycles
- To Add a Learncycle:
- Click “Add Learncycle”
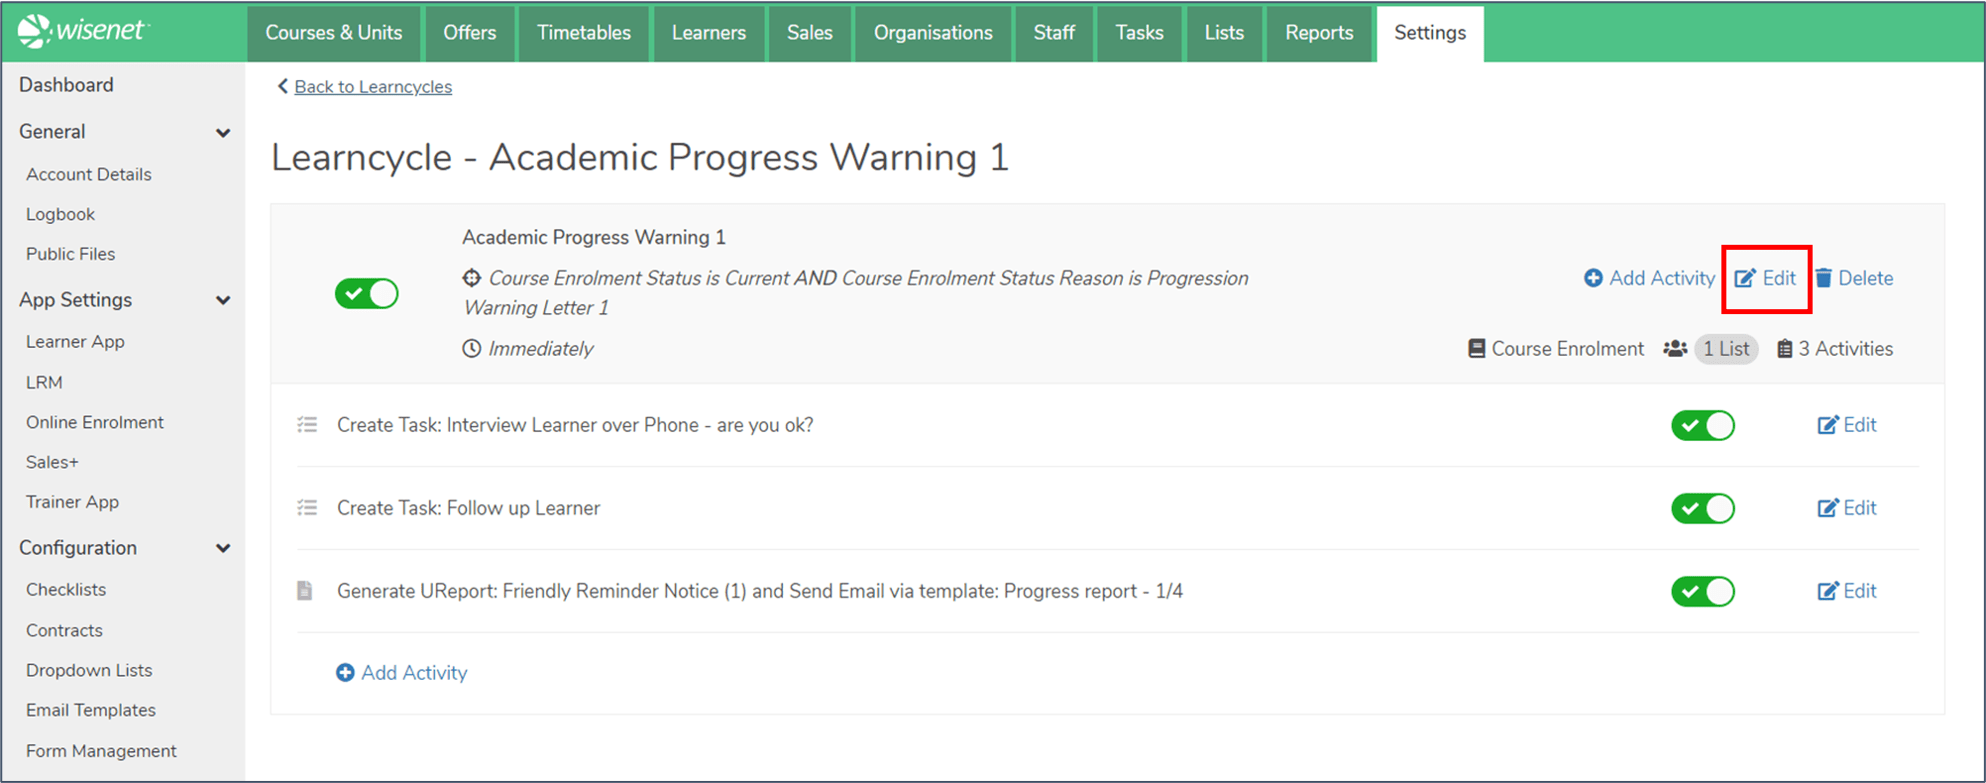
- To Edit a Learncycle:
- Click on the Learncycle name
- Click “Edit”
TIP: You can work on multiple Learncycles in different tabs by clicking on the ‘external-link’ icon.


2
A. Name the Learncycle
E.g. Application Approved Process
B. Select Trigger Conditions
Select the condition(s) which will trigger the Learncycle. You may choose one, many, or all conditions. The conditions are:
- Course Enrolment/Application is created
- Unit Enrolment is created
- Application Status is
- Accepted
- New
- Pending
- Rejected
- Reviewing
- Application Status Reason is [select an option]
- Course Enrolment Status is [select an option]
- Course Enrolment Status Reason is [select an option]
- Unit Enrolment Outcome Code is [select an option]
- Unit Enrolment Result is [select an option]
C. Select Trigger Date (optional)
NOTE: If one of your Triggers is “Course Enrolment/Application is created”, you cannot schedule a Trigger Date.
The default Trigger Date is immediately when the Trigger Condition is reached. To choose another Trigger Date:
- Click Add Schedule
- Select either Exactly On or the number of Days, Business Days, Weeks, Months after/before
- Select a Date:
- Application Expiry Date
- Course Enrolment/Application Creation Date
- Course Enrolment/Application End Date
- Course Enrolment/Application Start Date
- Course Enrolment/Application Status Change Date
- Course Enrolment/Application Reason Change Date
- Course Enrolment Actual End Date
- Course Enrolment Expected Award Date
- Course Enrolment Expiry Date
- Course Enrolment Orientation Date
- Course Enrolment Re-Enrolment Date
- Course Offer End Date
- Course Offer Start Date
- Unit Enrolment Start Date
- Unit Enrolment End Date
- Unit Enrolment Extension Date (NZ only)
- Unit Enrolment Actual End Date
D. Select Audience
- Choose whether this Learncycle will run for:
- All Course Offers, OR
- Course offers within selected lists
E. Save Options
Choose whether you want to:
- Save the Trigger Conditions without adding Activities, OR
- Save and Add Activity
- See Step 3 below on how to add activity
3
Add Activities
- Select Create Task from the dropdown list
- Give your task a Name
- Note: there is a maximum character limit of 200
- (Optional) Priority is set to ‘Low’ by default, change to ‘Medium’ or ‘High’ if needed
- (Optional) Status is set to ‘Not Started’ by default, change to ‘In Progress’, ‘Pending’ or ‘Completed’ if needed
- (Optional) Select who the task will be Assigned To
- (Optional) Select who the task is Assigned By
- (Optional) Type a description in rich text
- (Optional) Upload documents
- (Optional) Due Date is set to “No Due Date” by default. To set a Custom Due Date:
- Select either Exactly On or the number of Days, Business Days, Weeks, Months after/before
- Select a Date:
- Course Enrolment Actual End Date
- Course Enrolment/Application Start Date
- Course Enrolment/Application End Date
- Course Enrolment Expected Award Date
- Course Enrolment Expiry Date
- Course Enrolment/Application Creation Date
- Course Offer Start Date
- Course Offer End Date
- Course Enrolment/Application Status Change Date
- Course Enrolment/Application Reason Change Date
- Application Expiry Date
- Enable button is set to ON by default, click to disable if required
- Click Save or Save & Add Another
- Select Send Email
- Select one or more Recipients:
- Learner’s Email Address
- Learner’s Alternative Email Address
- Course Enrolment Agent
- Current Workplace Contacts
- Selected Staff
- Other Email Address
- Select the Reply-to email address:
- Configured
- Other
- Add the email Message:
- Compose an Email, OR
- Select an Email Template
- (Optional) Attach Files
- Enable button is set to ON by default, click to disable if required
- Click Save or Save & Add Another
- Select Generate uReport from the dropdown menu
- Enter a Name
- Select a uReport Template Type
- Contracts
- Training Plans
- Letters of Offer
- General
- Select a uReport Template
- (Optional) In the Visibility section, choose if you want Learners and/or assigned Trainers to see this document
- Choose an Email option:
- Do not send via email
- Send via email
- (Optional) If sending via Email:
- Select one or more Recipients:
- Learner’s Email Address
- Learner’s Alternative Email Address
- Course Enrolment Agent
- Current Workplace Contacts
- Selected Staff
- Other Email Address
- Select the Reply-to email address:
- Configured
- Other
- Add the email Message:
- Compose an Email, OR
- Select an Email Template
- (Optional) Attach Files
- Select one or more Recipients:
- Enable button is set to ON by default, click to disable if required
- Click Save or Save & Add Another Activity
- Select Update Learner from the dropdown menu
- Select one or more Fields to update:
- Learner is Active
- True
- False
- Learner App Access Enabled
- True
- False
- Learner Sync to Xero
- True
- False
- Learner App Expiry Date
- Select the number of Days, Business Days, Weeks, Months after/before
- Select a Date:
- Application Expiry Date
- Course Enrolment/Application Creation Date
- Course Enrolment/Application End Date
- Course Enrolment/Application Start Date
- Course Enrolment/Application Status Change Date
- Course Enrolment/Application Reason Change Date
- Course Enrolment Actual End Date
- Course Enrolment Expected Award Date
- Course Enrolment Expiry Date
- Course Enrolment Orientation Date
- Course Enrolment Re-Enrolment Date
- Course Offer End Date
- Course Offer Start Date
- Learner is Active
- Enable button is set to ON by default, click to disable if required
- Click Save or Save & Add Another Activity
- Select Update Course Enrolment from the dropdown menu
- Select one or more Fields to update
- Course Enrolment Status
- Options are shown here
- Course Enrolment Status Reason
- Configured in Settings > Dropdown Lists
- Course Enrolment for AVETMISS
- True
- False
- Course Enrolment Learner App Enrolment Access
- True
- False
- Course Enrolment Target Group
- Configured in Settings > Dropdown Lists
- Application Status
- Accepted
- New
- Pending
- Rejected
- Reviewing
- Application Status Reason
- Configured in Settings > Dropdown Lists
- Course Enrolment Status
- Enable button is set to ON by default, click to disable if required
- Click Save or Save & Add Another Activity
- Select Update Unit Enrolment from the dropdown menu
- Select one or more Fields to update
- Unit Enrolment Outcome Code
- Unit Enrolment Result
- Configured in Settings > Dropdown Lists > Result
- Enable button is set to ON by default, click to disable if required
- Click Save or Save & Add Another Activity
- Select Send SMS
- Send To: Learner Mobile Number is ticked by default
- (Optional) Type a name to explain the purpose of the SMS
- E.g., Upcoming Class Reminder
- (Optional) Add placeholders using the dropdown menu
- Type your message in the Body section
- As you type your message, you will see the Character Count increasing and the number of SMS Count. One standard SMS is 160 characters. After 160 characters, your message will become multi-part and it is 153 characters per part
- If this is being sent in bulk, each recipient will receive their own copy of the SMS
- Enable button is set to ON by default, click to disable if required
- Click Save or Save & Add Another Activity
