Wisenet’s new USI M2M integration with RAM allows users to Verify and Retrieve USI numbers in real time using a web services connection from within the Learner’s Personal Details page.
Follow the steps below to set up your USI M2M integration. If you do not see the option to connect to USI on the LRM > Settings > Integration > Connected Apps page then log a support request.
Contents
- 1 IMPORTANT: Before you begin, please ensure the following steps are completed:
- 2 Steps to add Adapt IT (Wisenet) as a notification in RAM:
- 3 Following steps have to be completed in Wisenet LRM
- 4 Go back to the Add notification page on RAM to complete the rest of the following steps
- 5 Go back to the USI Connector page on Wisenet LRM to complete the process
IMPORTANT: Before you begin, please ensure the following steps are completed:
Work with the business owner to:
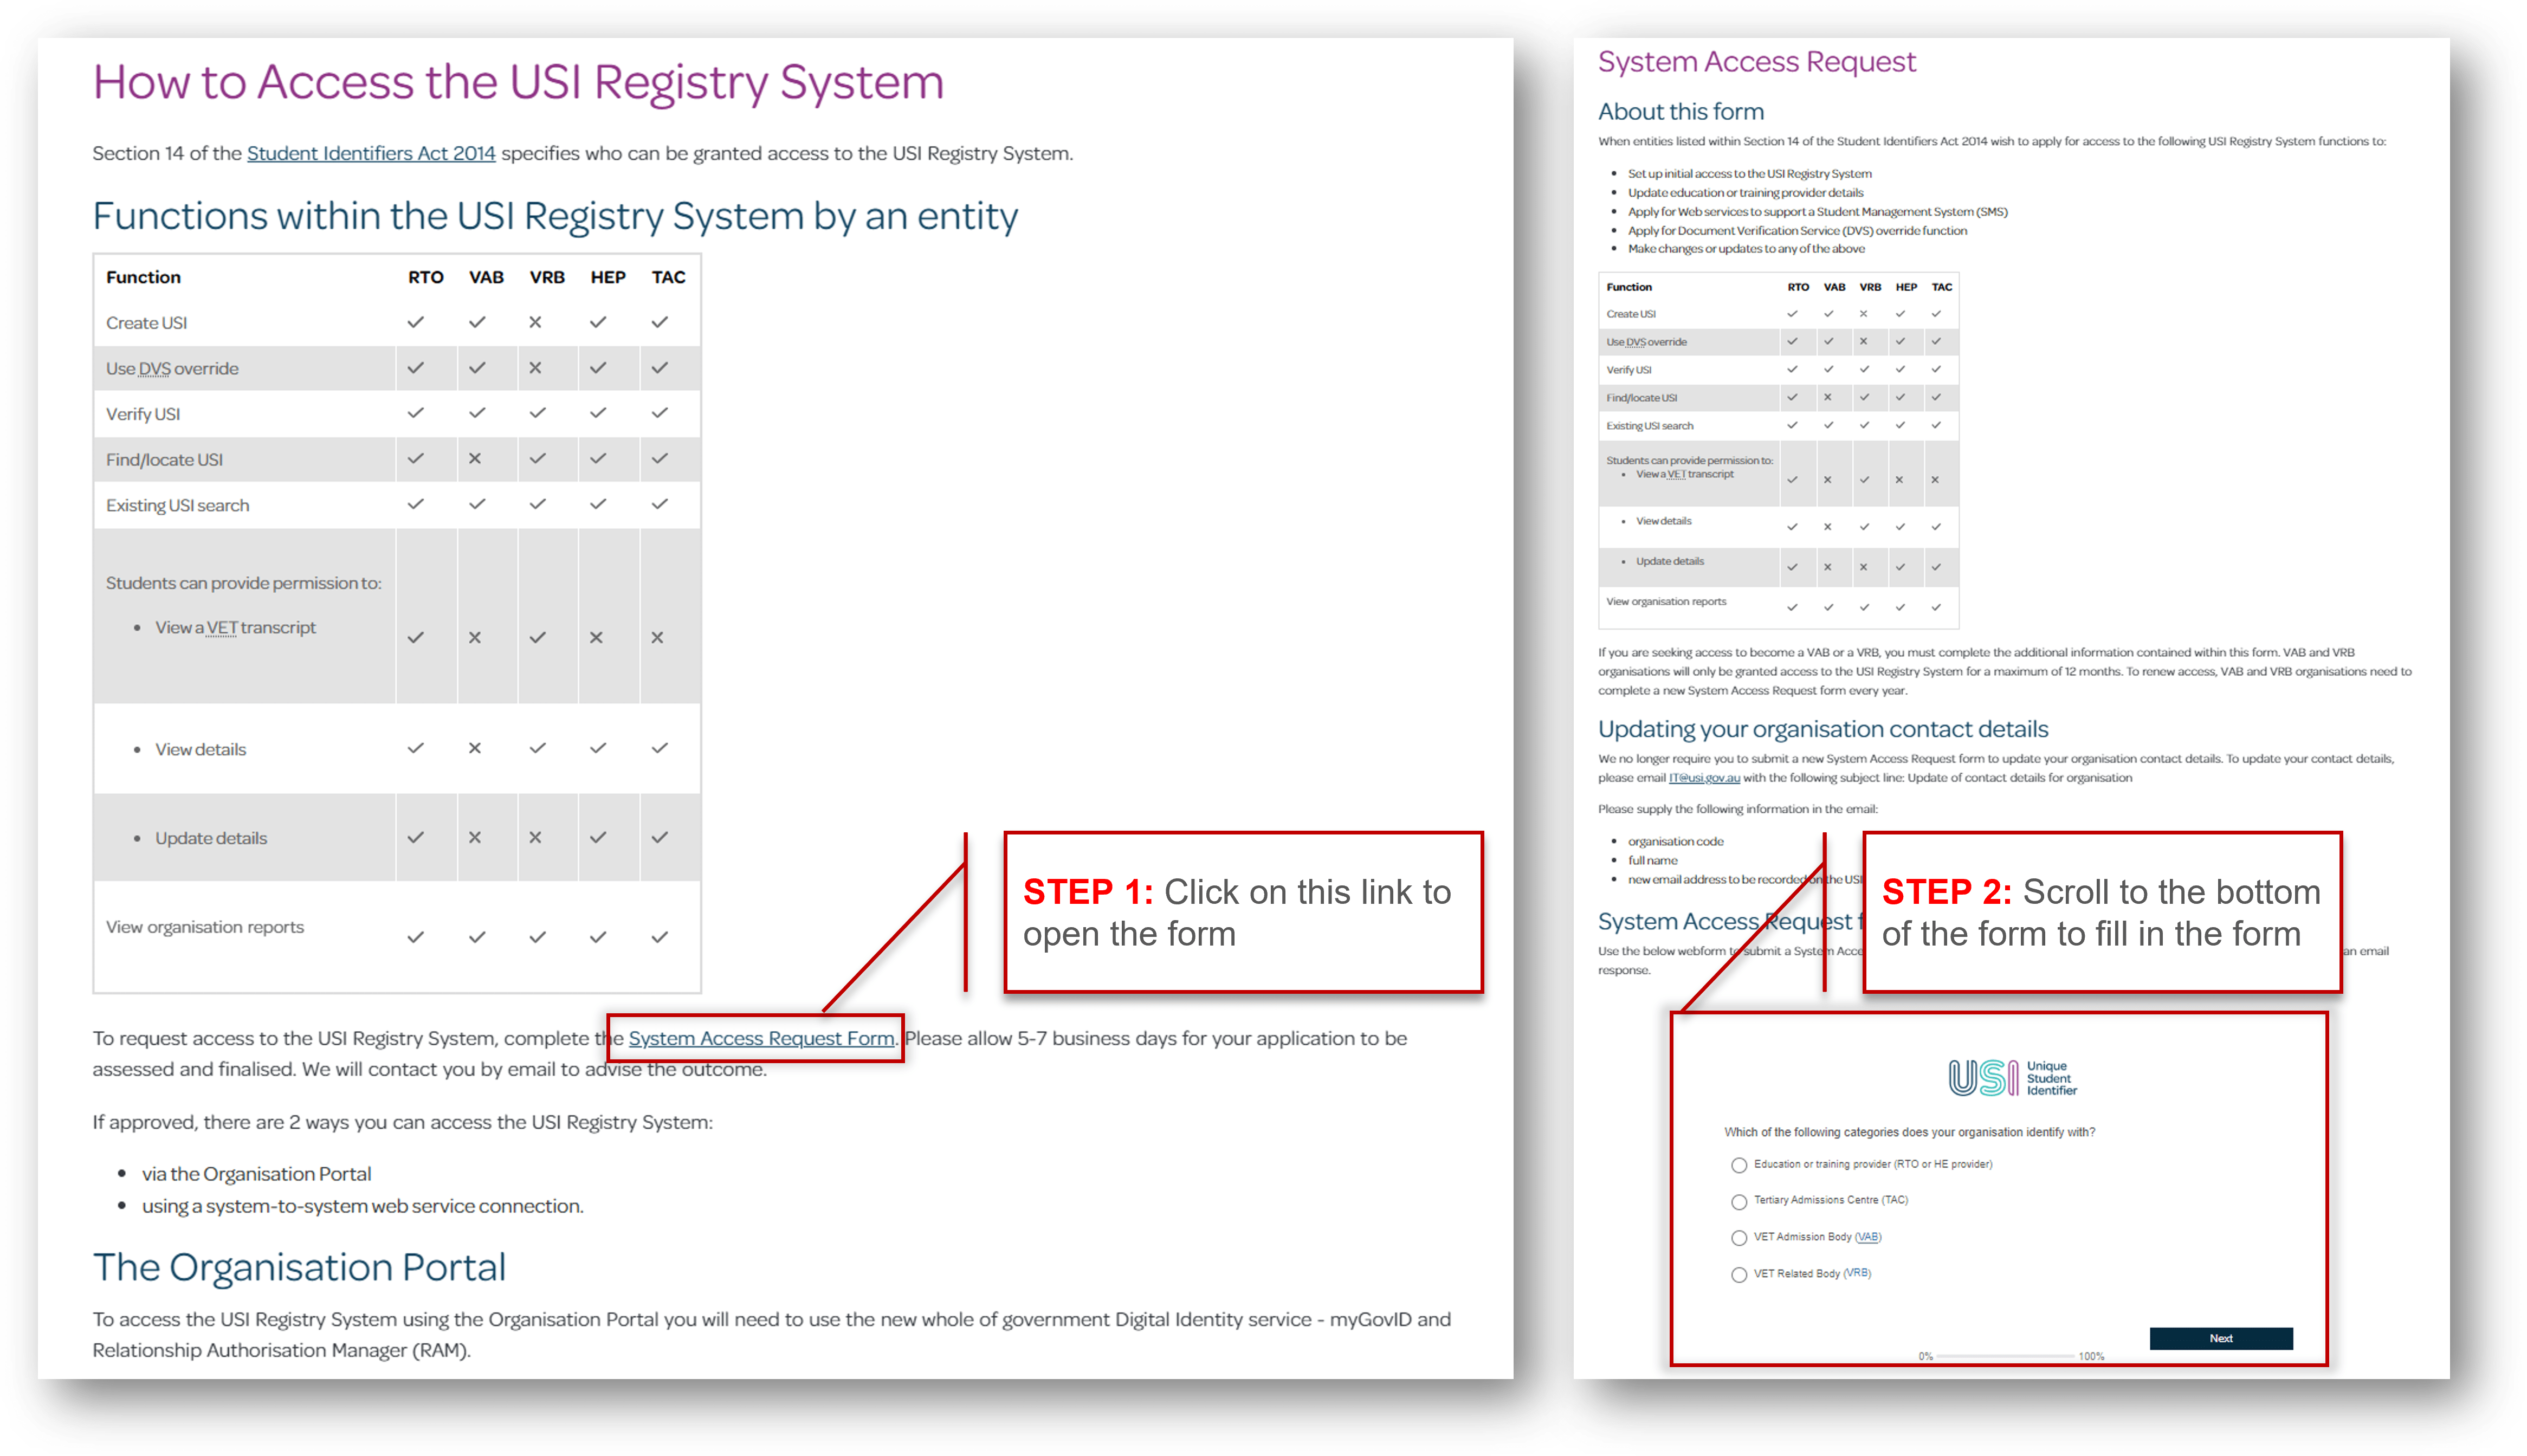
- Request access to the USI Registry System by completing the System Access Request Form
- IMPORTANT NOTE: If your business changes its details, i.e. ABN, you will need to repeat the integration process to reconnect the new business details.
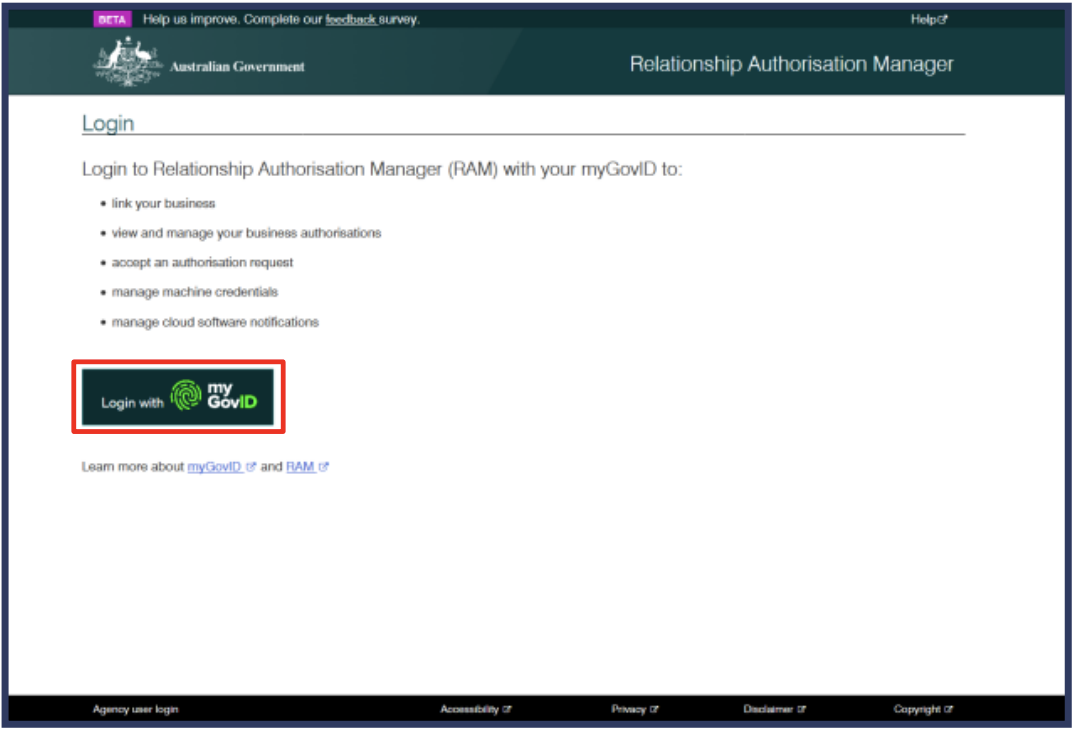
- Set up your MyGovID account – https://www.mygovid.gov.au/
- Set up your RAM account – https://info.authorisationmanager.gov.au/
- Ensure your business is linked in RAM. Instructions here: https://info.authorisationmanager.gov.au/principal-authority
Steps to add Adapt IT (Wisenet) as a notification in RAM:
R2
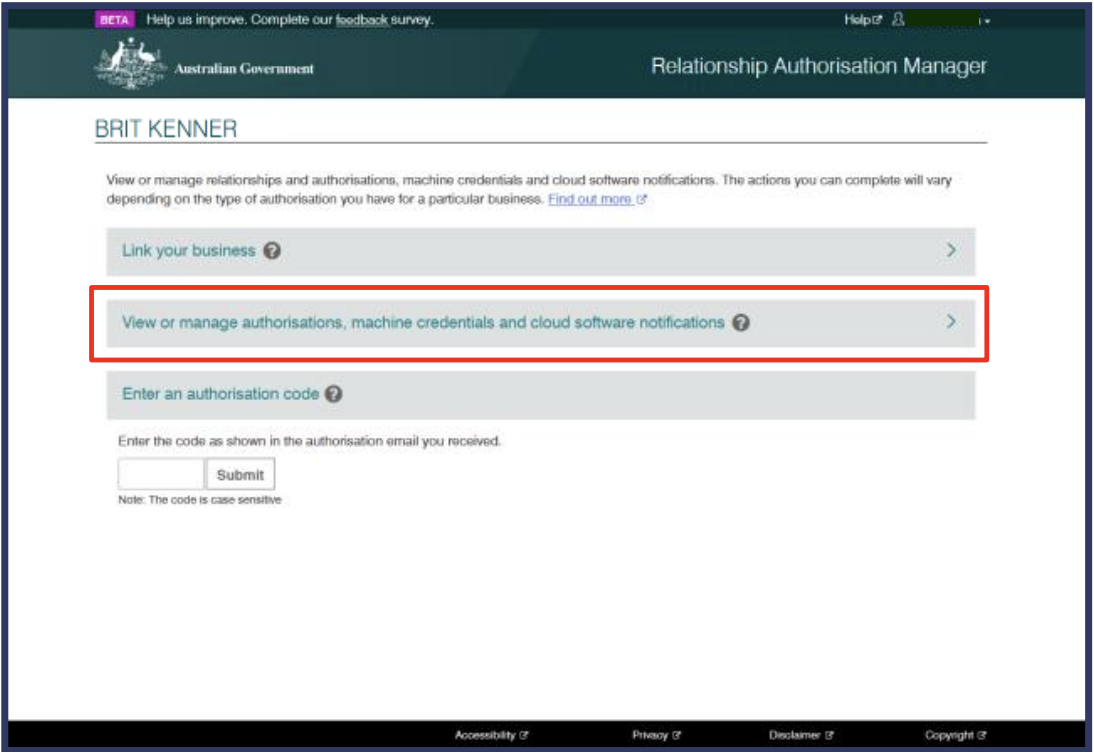
Click on ‘View or manage authorisations, machine credentials and cloud software notifications’.
R3
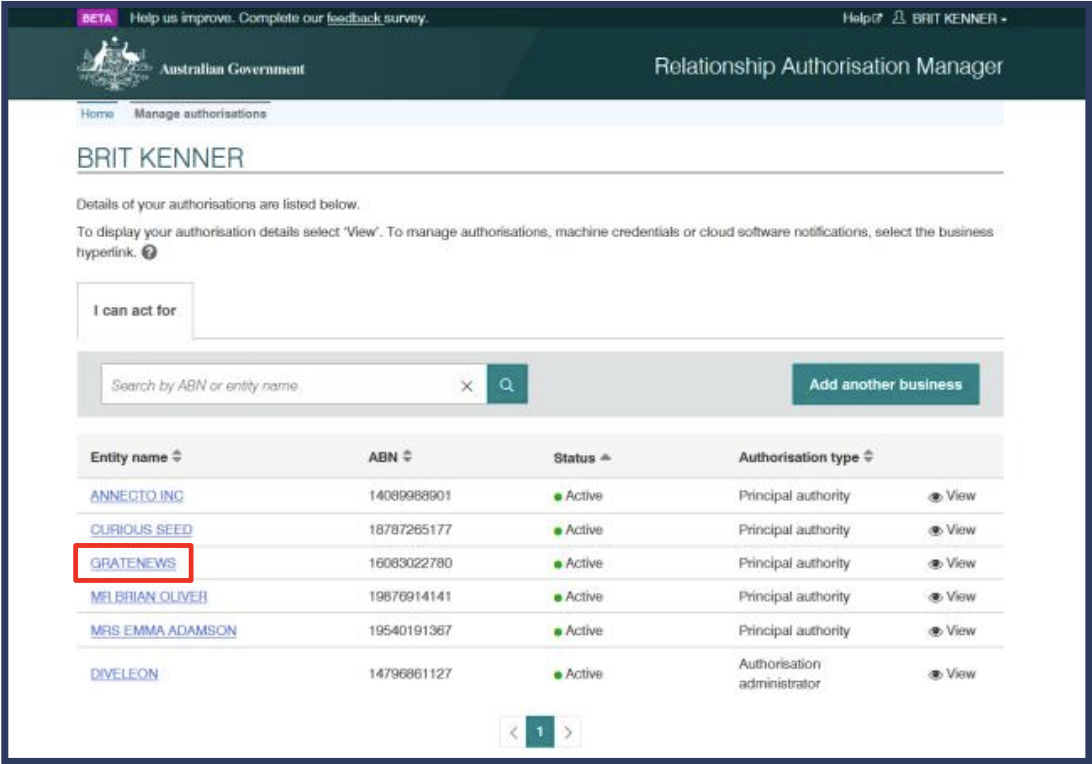
The ‘Manage authorisations’ screen will display. Click on the business that you require the notification for.
R4
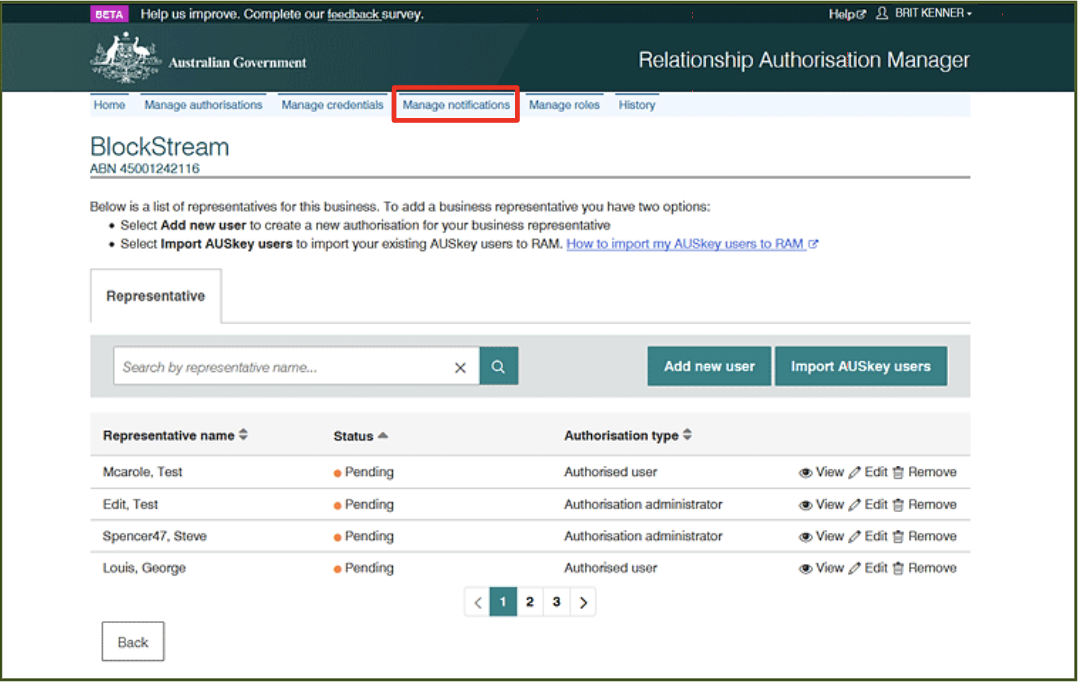
The ‘Manage notifications’ screen will display. Click the ‘Manage notifications’ tab.
R5
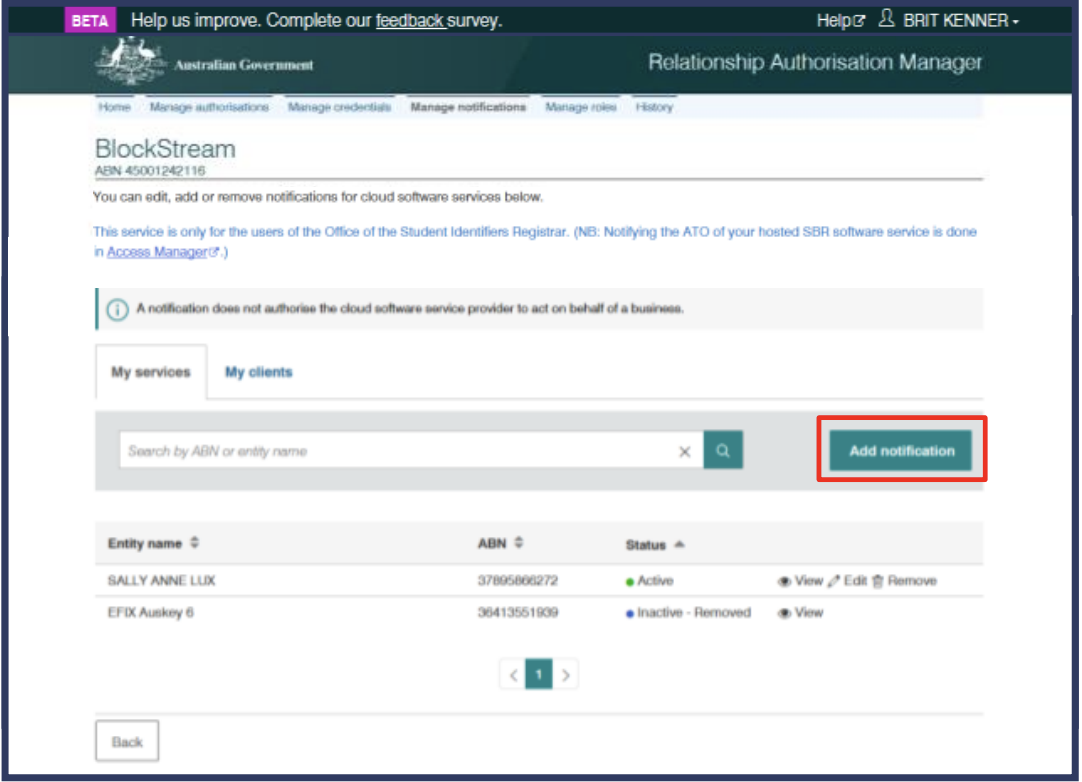
Click ‘Add notification’.
Note: If you do not see the ‘Add notification’ option, please ensure you are the Principal Authority or the Authorised Administrator for your business.
Following steps have to be completed in Wisenet LRM
Connecting to USI with M2M authentication
W1
Ensure you are the Portal Admin and Owner in Wisenet
- Navigate to Wisenet LRM > Settings
- In the Integration box, Click Connected Apps
- You will see a list of all your connected Apps as well as available Apps. Next to the USI Application select Connect to begin the authorisation process.

W2
You will be taken to the Connecting to USI with M2M authentication page
- Enter your:
- RTO Number (Enter the RTO number obtained from Training.gov.au) OR TEQSA Number ( Enter your Higher Education Provider ID obtained from TEQSA National Register)
- ABN – Enter the organisation ABN
- Then, click Continue

W3
Confirm if the business is connected in RAM
- Click Yes, proceed

W4
Note the Digital Service Provider ABN number, Software ID (SSID) and Start Date
- Do not click Yes, proceed before completing the below steps R6-9

Go back to the Add notification page on RAM to complete the rest of the following steps
cont.
R6
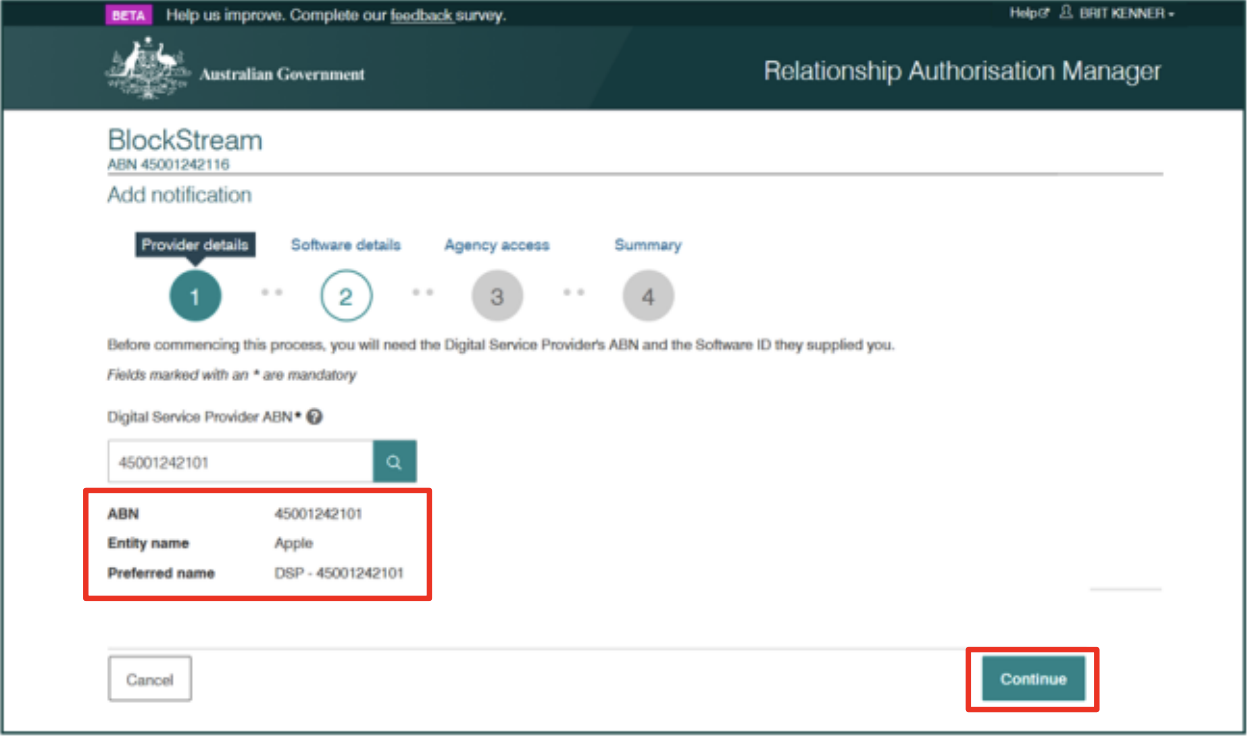
In the Digital Service Provider ABN field, enter Adapt IT’s ABN number: 12 168 059 078 (Note: Wisenet is a division of Adapt IT. RTOs cannot add a notification for their own ABN.)
Click on the Search icon and ensure details of Adapt IT (Wisenet) is displayed. Click Continue.
R7
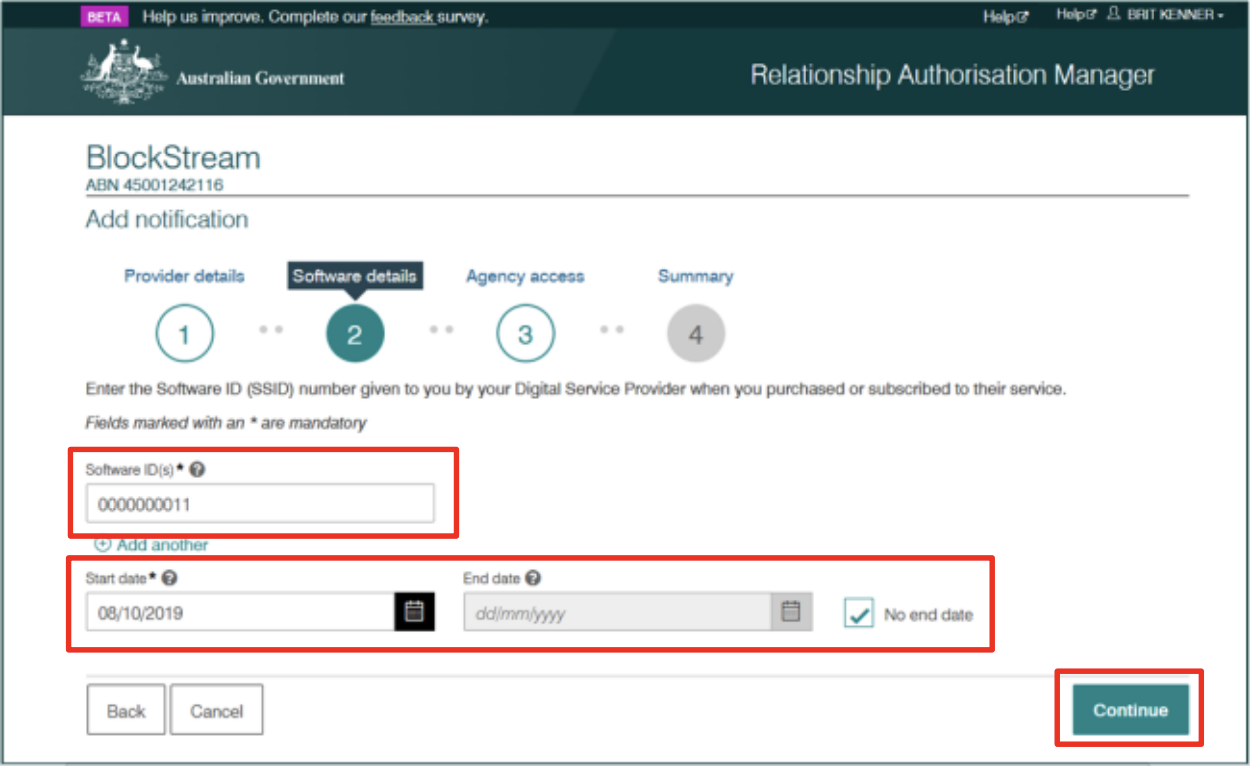
Enter the Software ID, Start Date and select ‘No end date’ as shown on LRM in Step W4. Click Continue.
R8
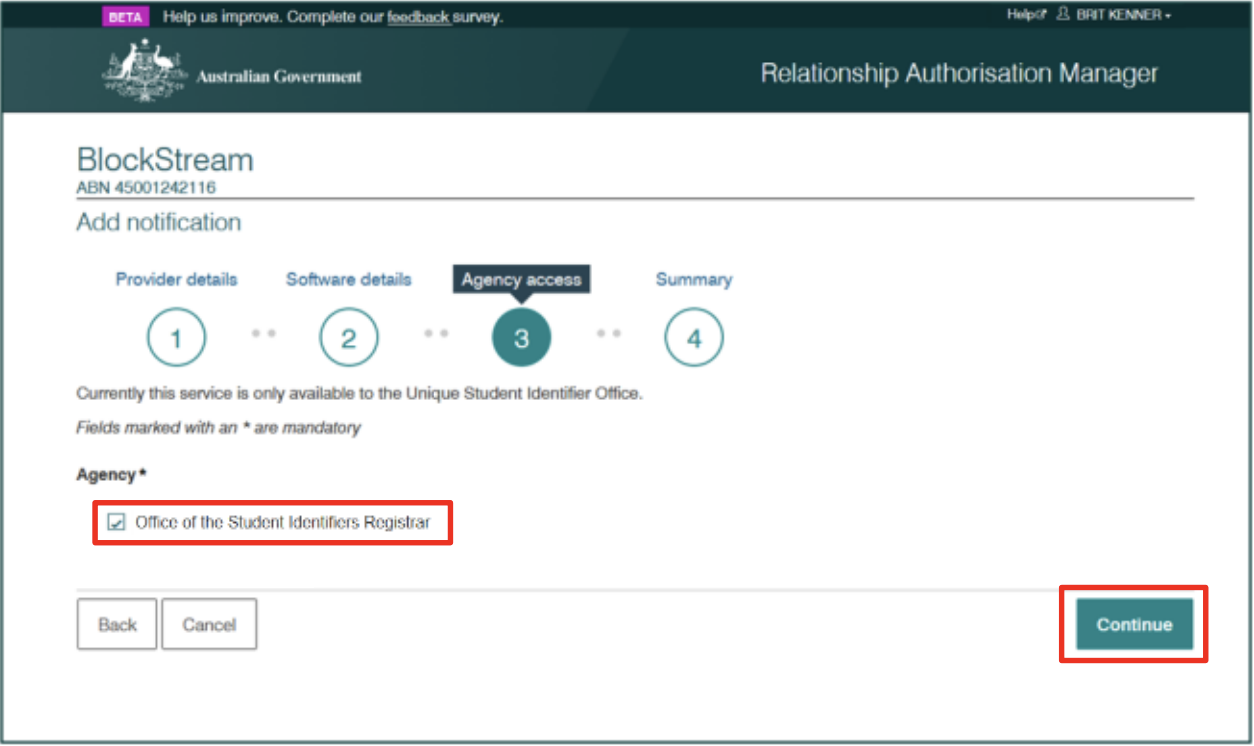
Select the check box for the agency required (currently this service is only available for the Office of the Student Identifiers Register). Click Continue.
R9
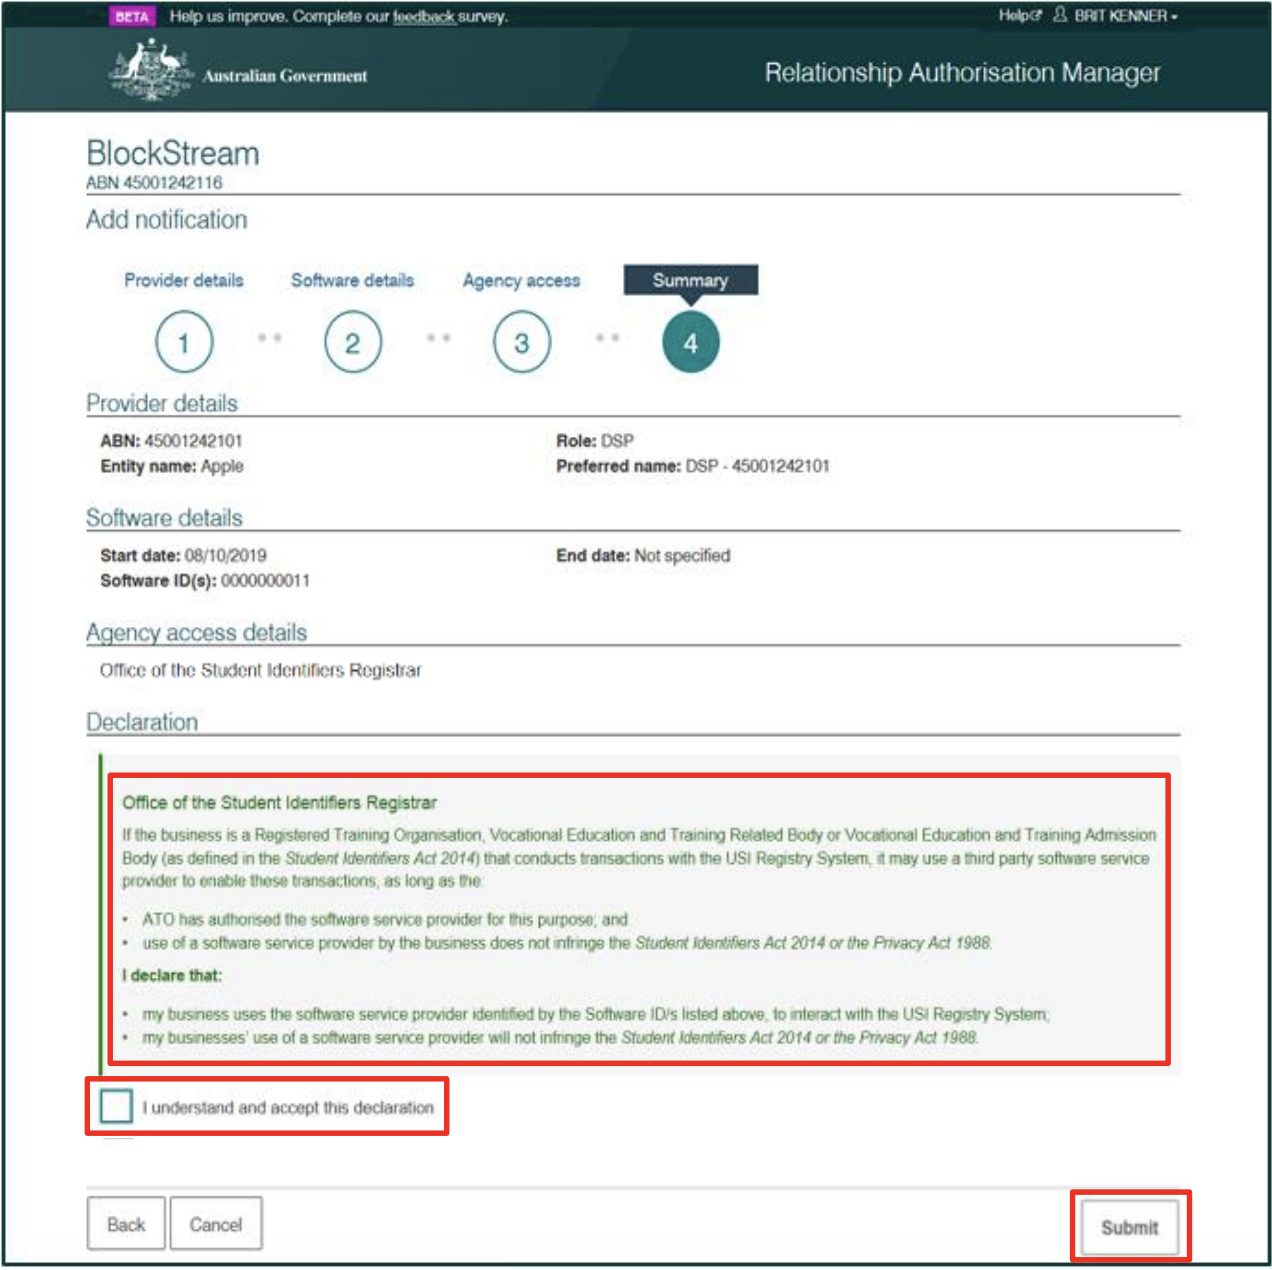
Review all notification information in the summary to ensure it is correct. Read and understand the declaration prior to accepting it. Select Submit.
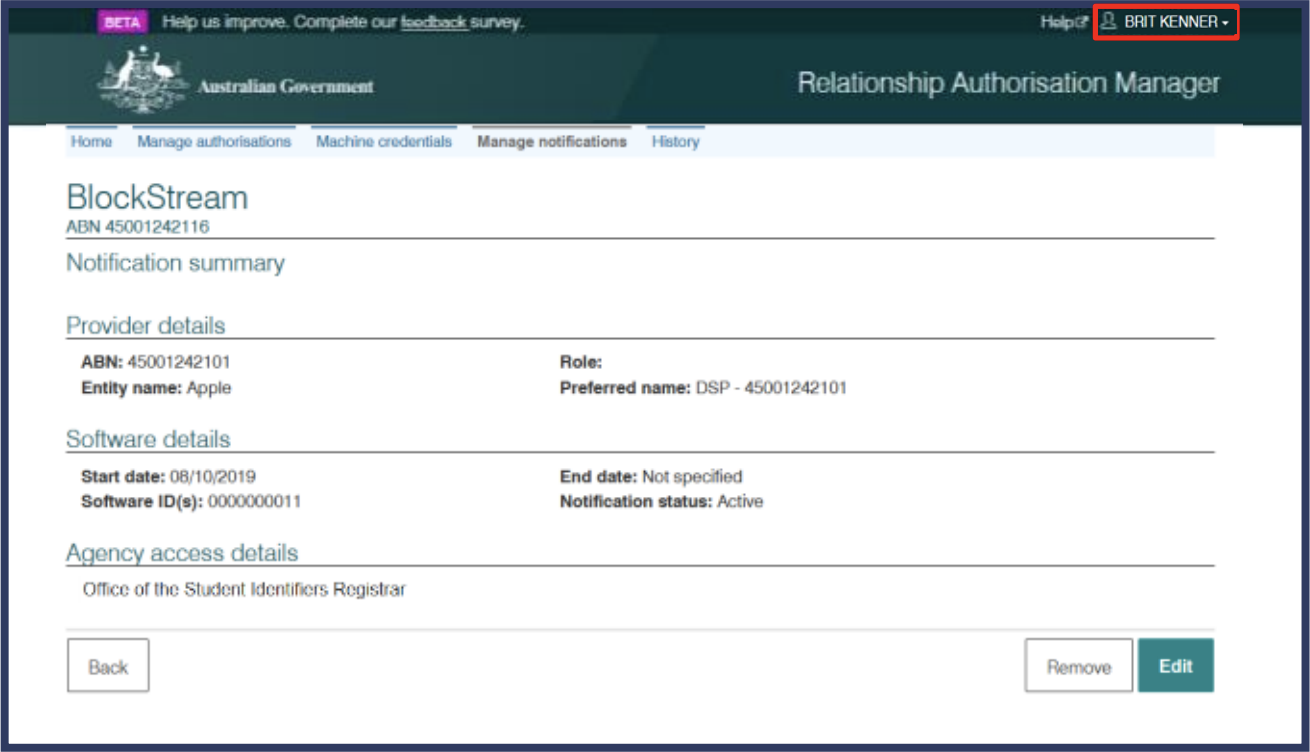
The newly added notification for Adapt IT will be listed on the Manage notifications screen to show your notification has been completed successfully.
Go back to the USI Connector page on Wisenet LRM to complete the process
cont.
W5
On the Connecting to USI with M2M authentication page, click Yes, proceed
Wait for the Connected Apps page to load and you will see it showing as Connected next to USI Connection Status.

- See the Verify USI and Retrieve USI options in the Learner’s Personal Details page
- The scheduled USI verification will occur automatically
- The Failed USI Count will show on the Dashboard

