The Sales API is designed specifically for handling sales activities on public facing websites. The endpoint functionality is highly scalable and secure preventing access to non public Wisenet data.
The best way to test the Sales API is to use Postman. Once the API is tested, you can generate example code by selecting Code below the Save/Send options.
The following steps outline how to get started.
1
Download Postman
- Skip this step if you already have Postman but check to ensure that you have the latest version
- Download Postman
2
Sales Api Postman Collection
A Postman Collection allows you to import an API schema with example API calls to fast track testing.
- Download the SalesApi Postman Collection
- this may open in a new window as json. It needs to be downloaded as a json file.
3
4
WisenetSalesApi Collection
- Choose the WisenetSalesApi Collection and expand to see folders and the example methods and endpoints. There are folders for:
- documents
- enquiries
- opportunities
5
Add APIKey
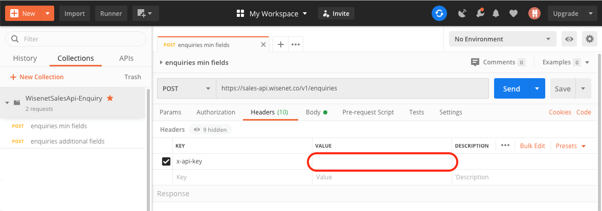
- Add the x-api-key into the header
- NOTE: This will be the SalesApiKey that is provided from LRM (NOT the public APIKey)
- See instructions on How to create/generate an API Key
- To create Sales API Keys you must have Sales Edition with Sales API Enabled
- Depending on your License you may not see the option for Public API
- NOTE: This will be the SalesApiKey that is provided from LRM (NOT the public APIKey)
6
API Calls
Each endpoint has different requirements. The Postman collection should demonstrate how each endpoint functions. There is also extra information below.
POST enquiries
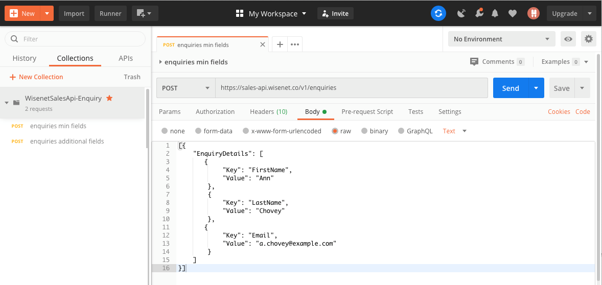
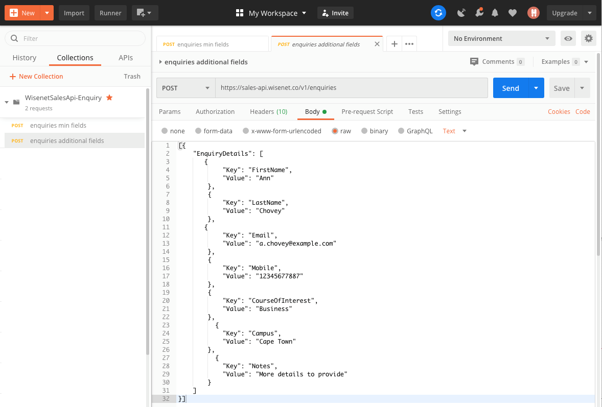
- The enquiry payload is a set of key value pairs
- The minimum required keys are FirstName, LastName and Email. This can be seen in the min fields example
- If you include EnquiryName then this will be used to set the TaskName for the created Task
- Add as many additional key value pairs as desired
- You can also reference already uploaded Documents by DocumentId
- Documents need to be uploaded first in order to obtain a DocumentId
- See POST documents for how to do this
- Then SEND when ready. This will send the Enquiry to the Sales section
- You will be able to find the Sales Contact and Enquiry Task
There are a number of steps that occur during the Enquiry submission. Learn how a Sales Enquiry is Processed
POST opportunities
- The opportunity payload is a set of key value pairs. The minimum required keys are FirstName, LastName, Email and OpportunityName. This can be seen in the min fields example
- Can also add the following keys that will map to Opportunity fields
- Amount
- CloseDate
- Pipeline – Must map to an existing Pipeline value
- Owner – Must map to an existing Owner value
- Stage – Must map to an existing Stage value
- Tags – Must map to an existing Tag value
- Add as many additional key value pairs as desired in the OpportunityDetails section
- You can also reference already uploaded Documents by DocumentId
- Documents need to be uploaded first in order to obtain a DocumentId
- See POST documents for how to do this
- Then SEND when ready. This will send the Opportunity to the Sales section
- You will be able to find the Sales Contact, Opportunity and Opportunity Task
There are a number of steps that occur during the Opportunity submission. Learn how a Sales Opportunity is processed
POST documents
The document upload process is a 2 step process.
- Use the POST documents endpoint to return a DocumentId and a DocumentPreSignedUrl
- The document endpoint is slightly different to the other endpoints. Please note the following differences:
- No body is required, only headers. Include:
- File-Name – your desired filename
- Used for file naming, visible in Wisenet
- The file name must contain a file extension
- File-Size – the file size in bytes
- Used for showing file size in Wisenet
- The file size must be greater than zero
- The maximum size for a file is 10MB
- File-Name – your desired filename
- No body is required, only headers. Include:
- The document endpoint is slightly different to the other endpoints. Please note the following differences:
- Use the DocumentPreSignedUrl returned from step 1 to upload the actual file. An example request is as follows:
curl -X PUT "<Insert DocumentPreSignedUrl>" -H "content-length: <Insert content-length>" --data-binary "<path to file eg. @path/to/filename.txt>" - Use the retrieved DocumentId to link the Document to the Opportunity
The Postman example demonstrates POST documents.


